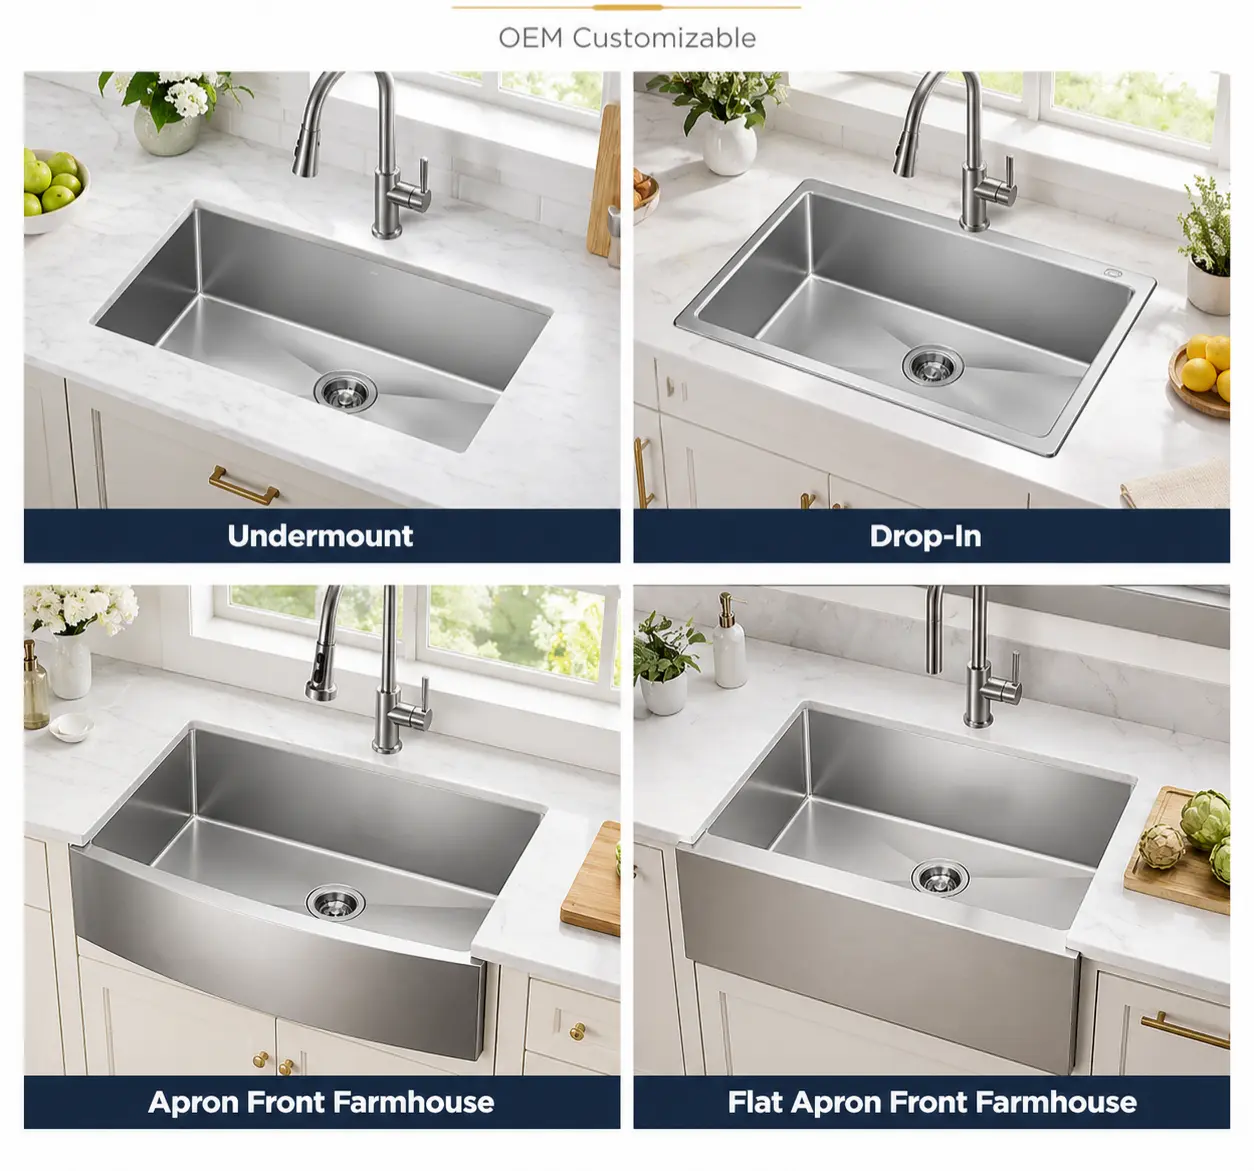
A farmhouse sink should normally rest on a structural support system inside the cabinet rather than depend on the countertop, adhesive, apron panel or drain pipe.
The support must be designed for the sink body, water, cookware, garbage disposal and expected use. Apron projection is model- and installation-specific: some sinks project beyond the cabinet face, but there is no universal projection that is correct for every sink. Measure the actual sink, define the reference plane and approve the cabinet mock-up before cutting.
The two most expensive farmhouse-sink mistakes are usually made before installation begins:
- The cabinet front is cut before the actual apron is measured.
- The sink is treated like a standard undermount sink without an independent load path.
A farmhouse sink is not just a bowl with a decorative front. It is a coordinated system involving the sink, support frame, cabinet opening, countertop, apron projection, plumbing and visible finish.
Quick Planning Rules
| Question | Professional answer |
|---|---|
| Does a farmhouse sink need cabinet support? | Usually yes; use the exact model instructions and a structure approved for the complete installed load |
| Can the countertop support the sink? | Do not assume so; countertop contact is not a substitute for a defined cabinet load path |
| Can the apron rest on the cabinet cutout? | Only where the sink design and installation method explicitly allow that contact |
| How far should the apron project? | Use the exact sink drawing, actual sample and cabinet/countertop reference planes; no universal number fits every model |
| Can a standard cabinet be cut for a farmhouse sink? | Sometimes, but removing the front rail can weaken it; cabinet structure must be reviewed and reinforced as required |
| Should the sink be measured before the countertop is fabricated? | Yes, especially for fireclay, composite and other models with meaningful dimensional variation |
| Does stainless steel need support because it is lighter? | Yes; lighter does not mean unsupported |
| Does a garbage disposal matter? | Yes; it adds permanent weight, vibration and plumbing-clearance requirements |
Farmhouse Sink vs Apron Front Sink
The terms are often used interchangeably, but they describe slightly different ideas:
- Farmhouse sink is the broader style term.
- Apron front sink describes the exposed front panel that replaces part of the cabinet front.
Common product structures include:
- Full-height apron front sink
- Short-apron retrofit sink
- Undermount-style farmhouse sink
- Flush-mount farmhouse sink
- Built-up or above-counter farmhouse sink
- Workstation farmhouse sink
- Single- or double-bowl apron sink
These products do not share one cabinet cutout or support method. A short-apron retrofit model may work with a modified standard cabinet, while a deep full-apron model may require a dedicated sink base.
Matrix supplies apron front and farmhouse sinks for brands, wholesalers and project programs, with cabinet opening, support, finish and packaging reviewed by model.
What Actually Supports a Farmhouse Sink?
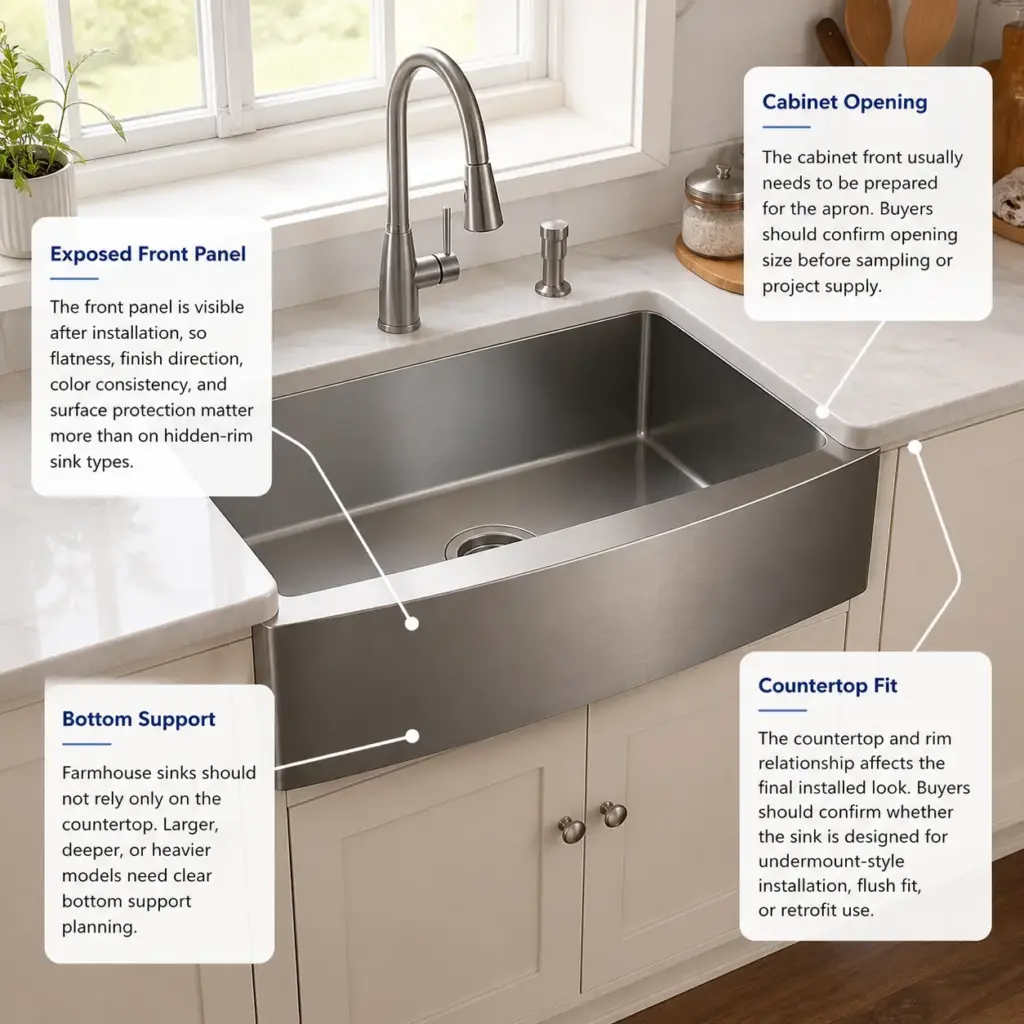
A reliable installation has a visible, traceable load path:
Loaded sink → approved bearing surface → frame, rails, platform or brackets → structural cabinet parts → cabinet base and floor
The countertop mainly completes the upper joint and finished opening. Sealant controls water entry and may provide adhesion where specified. Neither should be assumed to replace the structural support.
The following must never be treated as the primary sink support unless the exact engineered system explicitly says otherwise:
- Drain pipe
- Garbage disposal
- Silicone bead
- Countertop edge alone
- Decorative cabinet trim
- False drawer front
- Thin cabinet back panel
- Temporary shipping blocks
The apron is a visible front structure. It is not automatically a structural bracket.
What Load Must the Cabinet Support?
The empty sink weight is only the beginning.
A useful B2B load definition is:
Design service load = sink self-weight + water at the agreed fill condition + disposal and fixed accessories + defined cookware/use load
The support designer, cabinet supplier, installer or responsible project professional should confirm the required capacity and safety margin for the actual installation.
Do not copy a load figure without checking:
- Whether it is a tested or calculated value
- Which cabinet material and fasteners were used
- Whether the load was distributed or concentrated
- Whether the sink was empty or filled
- Whether a disposal was attached
- How long the load was applied
- Whether moisture or vibration was considered
A support that holds the empty sink during countertop templating may still be inadequate in service.
Material Changes the Support Requirement
Stainless Steel Farmhouse Sinks
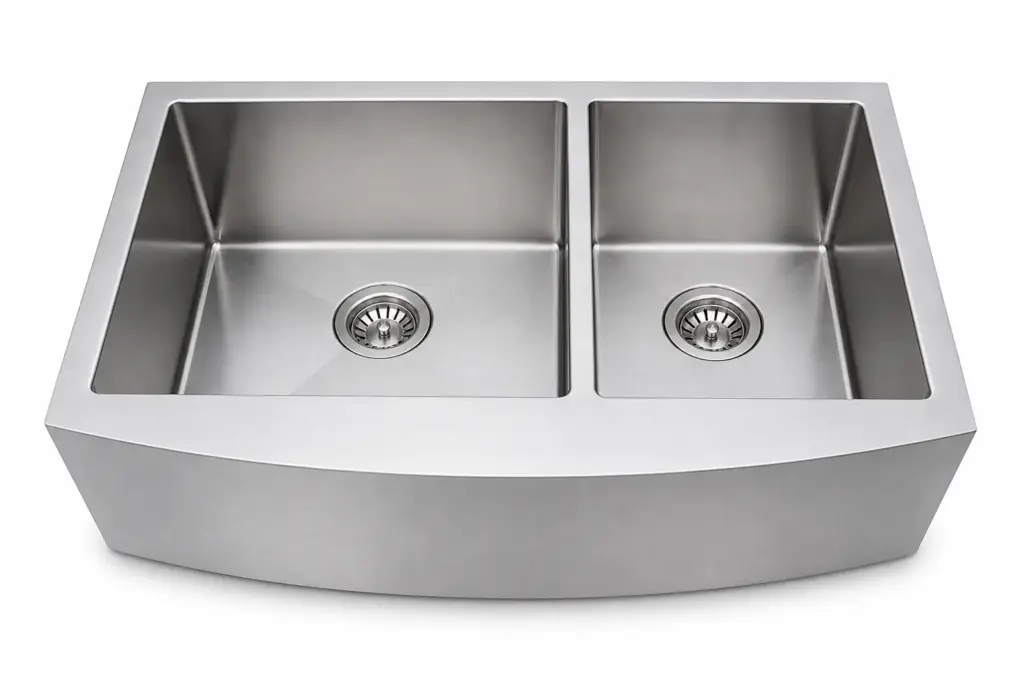
Stainless steel is usually lighter than fireclay, cast iron or granite composite. However, a large, deep stainless bowl can still carry substantial water and cookware load.
Check:
- Bottom bearing geometry
- Apron-to-bowl weld structure
- Rim flatness
- Gauge and empty weight
- Disposal and accessory load
- Front-panel protection
Thicker steel does not eliminate the need for cabinet support.
Fireclay and Ceramic Farmhouse Sinks
Fireclay sinks are heavy and brittle. Their dimensions and straightness may vary more than fabricated metal products because of forming and firing.
Check the actual sink before cutting:
- Overall width and depth
- Apron height and width
- Corner shape
- Rim height variation
- Bottom bearing surface
- Drain location
Avoid concentrated point support that can stress a brittle body. The approved support should distribute load across suitable bearing areas.
Granite Composite Farmhouse Sinks
Composite sinks are heavier than most stainless steel sinks and receive their geometry from a mold.
Review:
- Actual weight
- Molded bottom profile
- Support contact areas
- Apron flatness
- Cabinet opening
- Drain and disposal clearance
Enameled Cast-Iron Farmhouse Sinks
Cast-iron bodies are heavy and require robust distributed support. The enamel can chip if the sink is forced into a tight cutout or receives concentrated impact.
Material selection changes the load, handling and tolerance strategy—not the need for planning.
Cabinet Support Methods
| Support method | Typical advantage | Main limitation |
| Side and rear structural rails | Keeps central area open for plumbing | Cabinet walls and rail attachment must carry the load |
| Full or partial plywood platform | Distributes load over a broad area | Requires drain cutout, ventilation and service access |
| Adjustable support brackets | Allows final height adjustment | Must be rated and attached to suitable cabinet structure |
| Metal support frame | Useful for heavy or repeatable project installations | Requires correct size, corrosion protection and cabinet integration |
| Floor-supported cradle | Transfers load toward cabinet base or floor | Can reduce storage and complicate plumbing |
| Model-specific support kit | Coordinates with the intended sink | Must be installed exactly as specified |
No method is universally best. The sink’s bearing surface, cabinet construction, plumbing and service access should determine the design.
Face-Frame vs Frameless Cabinets
Face-Frame Cabinet
A face-frame cabinet has a structural frame across the front. Creating the apron opening may remove part of the upper rail.
Check:
- How much of the rail will be removed
- Whether the remaining stiles can resist spreading or twisting
- Where replacement reinforcement will be installed
- How the apron edges meet the face frame
- Door and false-panel clearances
Frameless Cabinet
A frameless cabinet relies more heavily on its side panels and connecting components. Cutting the front can reduce stability if the cabinet was not designed as a sink base.
Check:
- Side-panel material and thickness
- Front connector or stretcher locations
- Rail or bracket attachment
- Edge sealing after cutting
- Door alignment and cabinet squareness
Do not assume frameless construction is weaker or face-frame construction is automatically adequate. The actual material, joints and reinforcement determine performance.
Purpose-Built Cabinet vs Modified Standard Cabinet
Purpose-Built Farmhouse Sink Cabinet
Usually provides:
- A prepared apron opening
- Suitable structural sides or rails
- Fewer unnecessary front components
- Better door and apron coordination
- More predictable support installation
It still must match the exact sink dimensions.
Modified Standard Sink Cabinet
May be practical for a short-apron or retrofit model. A full apron often requires removal of a false drawer front and part of the upper cabinet structure.
Before cutting:
- Identify which parts are structural.
- Confirm the remaining opening width and apron height.
- Plan replacement reinforcement.
- Check door clearance below the apron.
- Seal exposed cabinet edges.
- Verify support and plumbing access.
Cutting first and reinforcing later is a high-risk sequence.
What Is Apron Projection?
Apron projection is how far the visible front of the sink extends beyond a specified reference plane.
The term is incomplete unless that reference is stated.
Two common measurements are:
Cabinet-Face Projection
The horizontal distance from the finished cabinet face or face frame to the frontmost point of the apron.
Countertop-Edge Relationship
The horizontal relationship between the apron face and the finished front edge of the countertop.
These are not the same measurement. The countertop may already project beyond the cabinet face.
For example, a sink apron can project beyond the cabinet face while remaining nearly aligned with the countertop front edge. A drawing that says only “projection” leaves room for interpretation.
How Far Should a Farmhouse Sink Stick Out?
There is no universal apron projection.
Some installation instructions specify a particular projection for a particular model, but that value should not be transferred to another sink.
The correct amount depends on:
- Sink design
- Flat, curved, fluted or stepped apron shape
- Apron side returns
- Cabinet face-frame thickness
- Door and drawer plane
- Countertop front overhang
- Installation type
- Desired reveal
- Water-drip management
- Product instructions
Use this approval order:
- Exact sink drawing and installation guide
- Actual production-representative sink
- Cabinet drawing
- Countertop edge profile
- Full-size mock-up or dry fit
If these disagree, resolve the difference before cutting the cabinet or countertop.
Three Reference Planes That Must Appear on the Drawing
Plane A: Finished Cabinet Face
This may be the face frame, door front or finished panel plane. State which one is used.
Plane B: Frontmost Apron Surface
For a curved or decorative apron, specify whether measurement is taken at the center, side return or frontmost point.
Plane C: Finished Countertop Front Edge
Include the countertop build-up, laminated edge or decorative profile—not only the raw slab.
A professional side-view drawing should dimension:
- A-to-B: cabinet-face-to-apron projection
- A-to-C: countertop projection beyond cabinet
- B-to-C: apron relationship to countertop front
This eliminates the ambiguous instruction “leave the sink about this far out.”
Apron Projection Is Also a Water-Management Decision
Projection affects more than appearance.
Too Little Projection
- Cabinet face may sit proud of the apron.
- Water can run into the upper cabinet joint.
- A curved apron may appear recessed.
- Cleaning the side transitions may be difficult.
Too Much Projection
- Apron becomes easier to bump.
- Side gaps or unfinished sink surfaces may be exposed.
- Countertop and cabinet proportions may look incorrect.
- Doors or adjacent drawers can appear recessed.
- Decorative finishes face greater impact risk.
The apron should be reviewed from the front, side and top—not only in elevation.
Apron Height and Cabinet Doors
Apron height determines how much of the cabinet front must be removed.
Before cutting, compare:
- Actual apron height
- Distance from cabinet top to door top
- Required reveal or filler below the apron
- Door adjustment range
- Countertop thickness
- Sink rim elevation
If the apron is taller than the available space above the doors, the result may require shorter doors, a filler-panel redesign or a different cabinet.
Do not assume a nominal “10-inch apron” is exactly 10 inches on the actual sink.
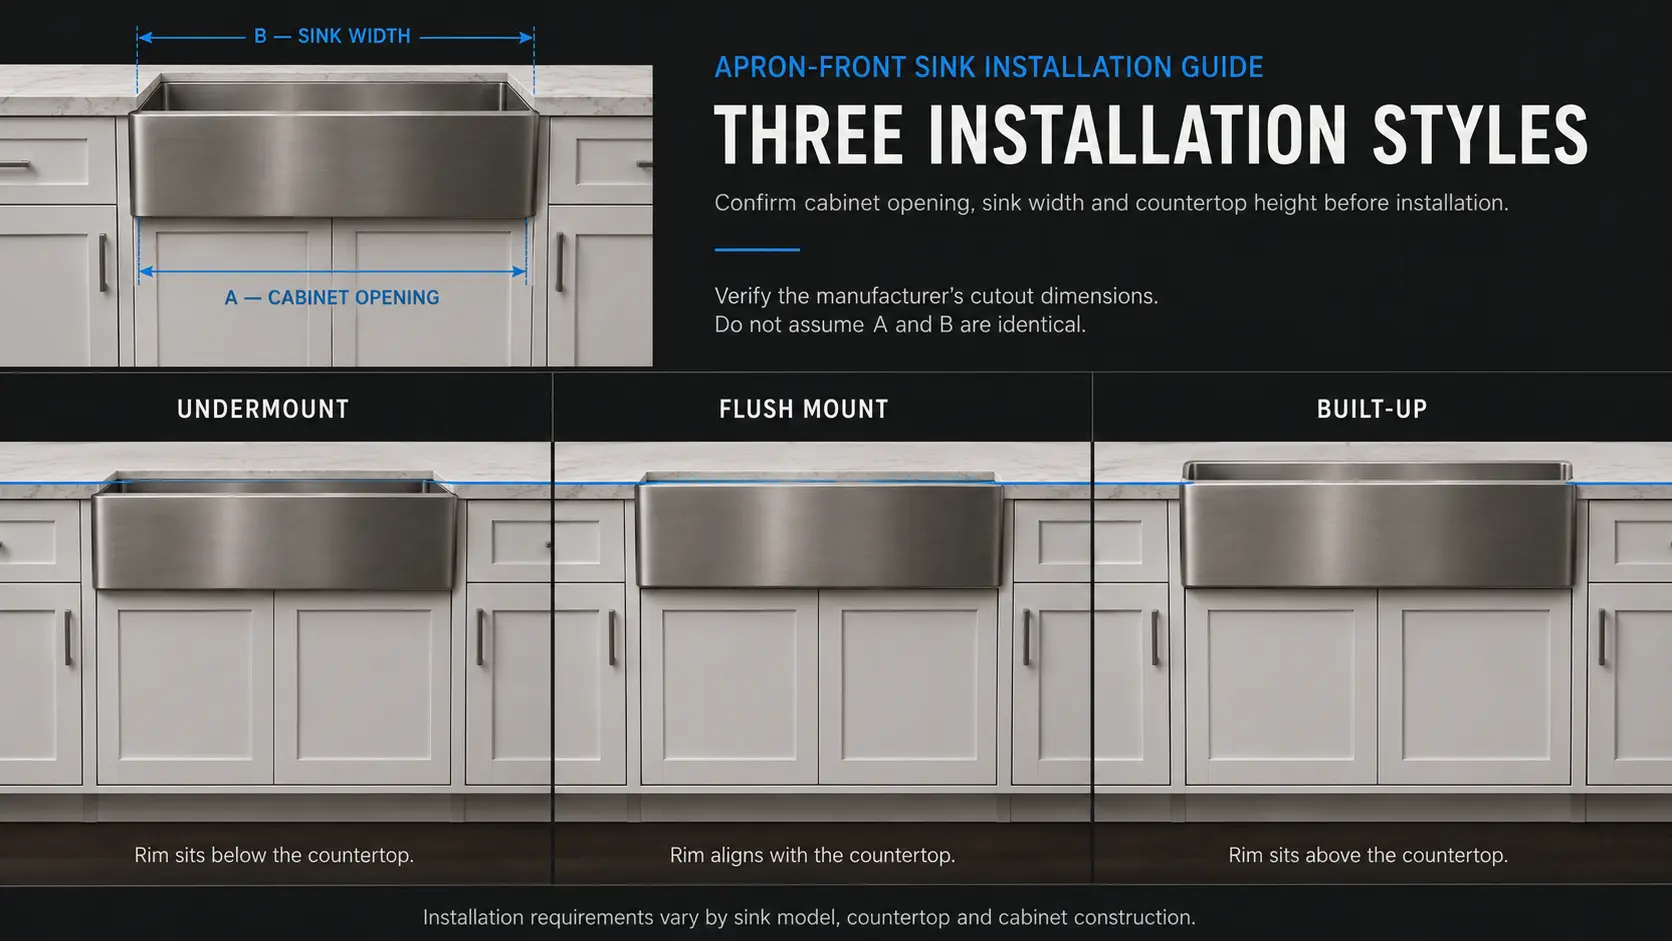
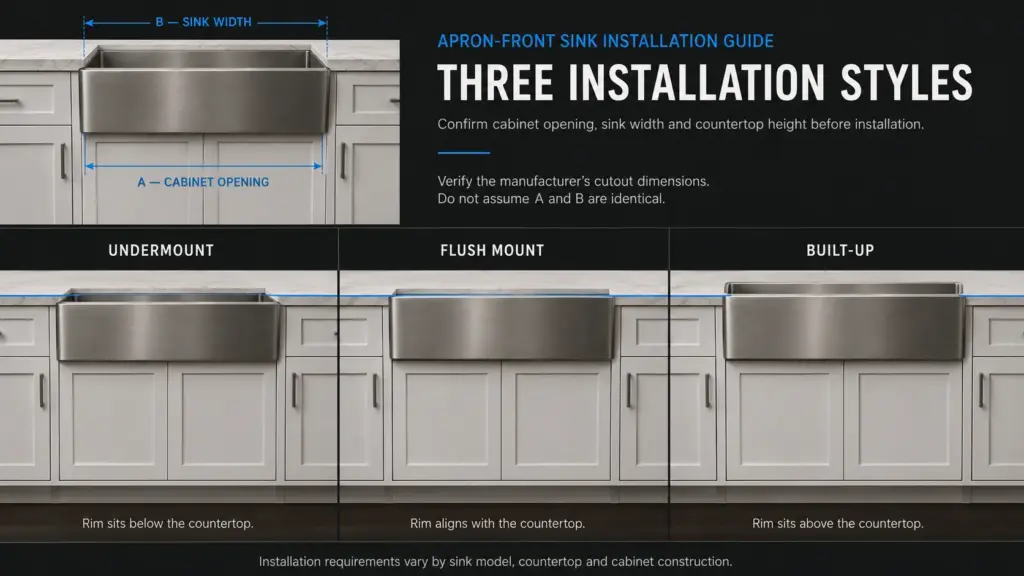
Rim Elevation: Undermount, Flush or Built-Up
The support height depends on how the sink rim relates to the finished countertop.
Undermount-Style Installation
The sink rim sits below the countertop. The counter may create positive, zero or negative reveal around the bowl depending on the approved cutout.
Flush Installation
The sink rim aligns with the surrounding finished surface. This requires precise coordination of support height, sink rim and countertop fabrication.
Built-Up or Above-Counter Installation
The rim sits above the surrounding counter or underlayment by a defined amount.
Do not determine support height from the apron alone.
A useful relationship is:
Support elevation = required sink-rim elevation − actual distance from the rim to the approved bottom bearing surface
Allow for any approved setting material or noncompressible adjustment components. Use actual measured geometry rather than catalog nominal dimensions.
Why the Actual Sink Should Be Available Before Countertop Templating
The actual sink helps verify:
- Apron width and height
- Rim outline
- Bowl opening
- Corner radii
- Rim flatness
- Apron curve
- Side returns
- Drain location
- Support-bearing areas
This is especially important for fireclay and other materials that may show dimensional variation.
A PDF drawing is important for planning, but it cannot reveal every production variation or visible fit issue.
Do not fabricate an expensive countertop from a generic farmhouse-sink outline when the exact sink or an approved production-equivalent sample can be checked.
Recommended Installation-Planning Sequence
1. Confirm the Sink Model
Review material, weight, dimensions, drain position, apron structure and installation type.
2. Inspect and Measure the Actual Sink
Check for transit damage, distortion, finish issues and dimensional variation before modifying the cabinet.
3. Confirm the Cabinet Structure
Identify load-bearing panels, rails, doors, fillers and the planned apron opening.
4. Define the Installed Position
Approve rim elevation, reveal, apron projection and left/right alignment.
5. Design the Support
Create a continuous load path while preserving drain and disposal access.
6. Dry-Fit the Sink
Verify:
- Sink sits level
- Support contacts intended bearing areas
- Apron is centered
- Projection matches the drawing
- Doors clear the apron
- Plumbing fits
- Countertop can be templated accurately
7. Template and Fabricate the Countertop
Use the approved sink position and reveal.
8. Seal and Set the Sink
Prepare surfaces and apply compatible products according to the exact installation method.
9. Connect Plumbing Without Stress
The drain and disposal must not pull the sink into position or carry its weight.
10. Inspect the Finished Installation
Check support, reveal, apron alignment, seal continuity, plumbing clearance and leaks.
Plumbing and Garbage Disposal Clearance
The support system must leave room for:
- Drain body or basket strainer
- Garbage disposal
- Disposal discharge
- P-trap
- Dishwasher hose
- Water-supply valves
- Faucet hoses
- Filtration equipment
- Future service and removal
A platform with a small drain hole may work for a strainer but block installation or removal of a garbage disposal.
The disposal also adds permanent weight and operating vibration. Include it in the support plan rather than hanging it after the sink support has been approved.
Drain position matters too. A rear or offset drain can improve cabinet organization, but it may conflict with the rear wall or support rails. Review the installed envelope in front and side views.
Support Contact: Distributed Is Better Than Accidental
Support should contact the areas intended to carry the sink.
Avoid:
- One high corner carrying most of the load
- Loose stacked shims
- Cardboard or moisture-sensitive packing
- Fasteners pressing directly into a brittle sink body
- A platform touching only the drain recess
- Expanding foam used as an undocumented structural support
- Forcing an irregular sink into a rigid opening
Where adjustment is required, use approved durable components and preserve broad, stable contact.
The appropriate detail varies by sink material and support system. Do not invent point supports because they are easier to install.
Cabinet Cutout: Fit Without Forcing
The cabinet opening must accommodate the apron while preserving the required structure and finished reveal.
Check:
- Opening width at top and bottom
- Apron width and taper
- Corner radii
- Apron height
- Side-return geometry
- Desired side reveal
- Edge finishing
- Structural reinforcement
An opening that is too tight can:
- Chip fireclay or enamel
- Scratch stainless or PVD finishes
- Twist the cabinet
- Prevent the sink from sitting level
- Transfer point load into the apron
An opening that is too large can create uneven side gaps that are difficult to conceal.
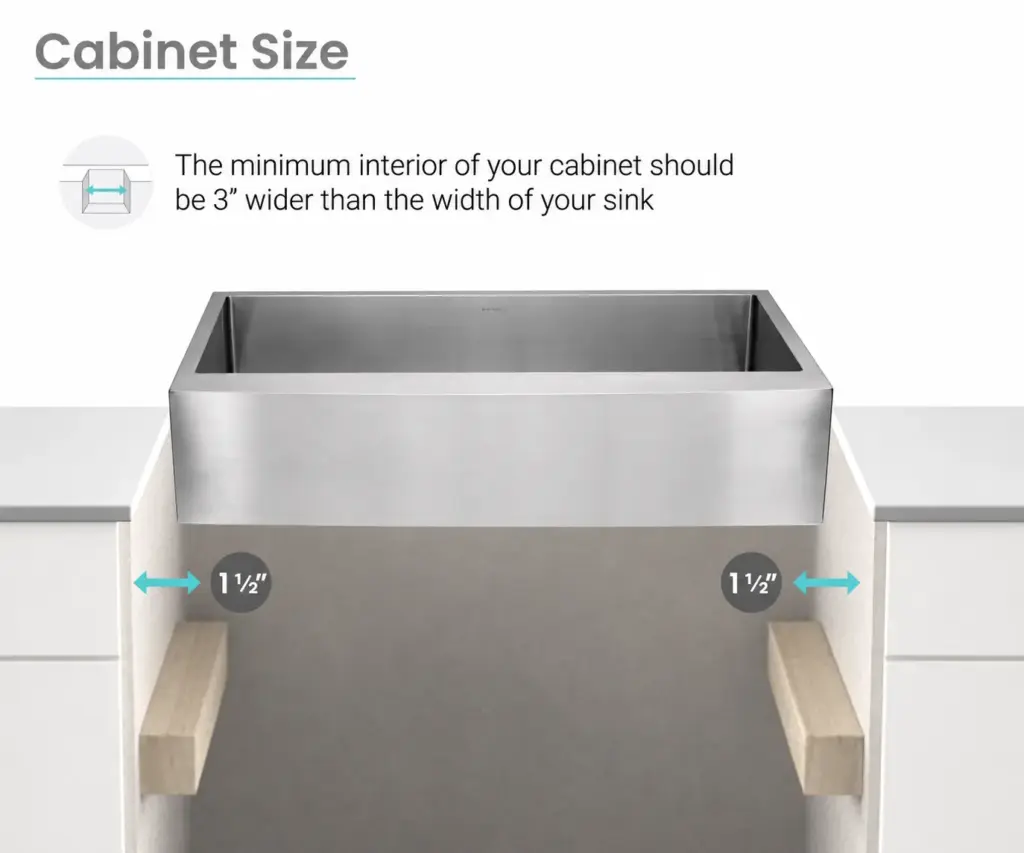
Do Not Size the Cabinet from the Nominal Sink Width Alone
A “33-inch farmhouse sink” does not automatically fit every 33-inch cabinet.
Verify:
- Cabinet outside width
- True internal width
- Face-frame opening
- Apron width
- Bowl and rim width
- Support thickness
- Fastener access
- Side clearance
Minimum cabinet size is model-specific. Product width and required cabinet width are not interchangeable.
Protect Every Cut Cabinet Edge
Farmhouse installation often exposes new cabinet edges near water.
After cutting:
- Finish rough edges cleanly.
- Seal moisture-sensitive cores.
- Protect exposed laminate or wood-based material.
- Avoid open joints that collect water.
- Maintain serviceable seal transitions.
Cabinet support can weaken over time when a small rim leak repeatedly wets particleboard, MDF or unfinished wood.
Water protection is part of structural durability.
Common Installation Failures and Root Causes
| Symptom | Likely root cause |
| Sink drops or develops a gap below the countertop | Support height changed, frame loosened or support was incomplete |
| Countertop cracks near the sink | Counter was carrying unintended load or cutout geometry concentrated stress |
| Fireclay body cracks | Point loading, impact, forced fit or unsupported service load |
| Apron rubs cabinet doors | Apron height, projection or door plane was not coordinated |
| Uneven side gaps | Cabinet cutout or apron dimensions were not checked from the actual sink |
| Sink rocks before sealing | Support contact is uneven or the sink bearing surface varies |
| Drain leaks after use | Plumbing was used to pull or hold the sink, or connections are under stress |
| Disposal has no clearance | Support, bowl depth and disposal envelope were approved separately |
| Apron appears tilted | Support is not level, cabinet is out of square or apron geometry was not inspected |
| Visible front is scratched after delivery | Apron was not isolated and protected in packaging |
Diagnose the load path, cabinet geometry, sink body and plumbing separately. Cosmetic resealing does not correct failed support.
Warning Signs After Installation
Arrange inspection when you notice:
- Growing gap between countertop and sink rim
- Cracked or stretched sealant
- Apron moving relative to cabinet
- Cabinet doors becoming misaligned
- Support rails separating from cabinet walls
- Sink movement when the disposal runs
- Water damage below the rim or support
- New cracks in sink, countertop or cabinet
- Drain pipe visibly carrying or pulling the sink
Stop heavily loading a sink that has moved. Do not test it by filling the bowl.
B2B Product Specification Checklist
A professional farmhouse-sink file should include:
- Product model and drawing revision
- Material and finish
- Empty sink weight
- Agreed water/load condition
- Overall width, depth and height
- Apron width, height and geometry
- Rim profile and flatness expectation
- Bottom bearing areas
- Drain X/Y coordinates
- Drain-hole and recess dimensions
- Installation type
- Cabinet opening reference
- Support concept and excluded contact areas
- Apron projection reference planes
- Countertop cutout and reveal
- Disposal assumption
- Accessory list
- Packaging protection
- Inspection and handover records
“Fits a farmhouse cabinet” is not a specification.
B2B Cabinet and Apron Approval Checklist
| Area | Approval question |
| Sink weight | Has the complete service load been defined? |
| Bearing surface | Which sink areas are approved to contact the support? |
| Load path | Does support transfer load into structural cabinet parts? |
| Cabinet front | What structure is removed, retained or reinforced? |
| Apron opening | Does it match the actual width, height, taper and corner shape? |
| Projection | Is the measurement referenced to cabinet face and countertop edge? |
| Rim elevation | Is the sink undermount, flush or built-up? |
| Countertop | Are cutout, reveal and edge profile coordinated with the sink? |
| Doors | Do door and filler planes clear the apron? |
| Plumbing | Can the drain, disposal and trap be installed and serviced? |
| Finish | Is the visible apron flat, consistent and protected? |
| Packaging | Can the apron and corners survive sink-plus-accessory shipment? |
| Repeat order | Are sink, cabinet and packaging revisions controlled? |
Copyable Farmhouse Sink Installation Specification
Product Identification
Install the exact farmhouse sink model and drawing revision approved for the project. Confirm material, finish, empty weight, overall dimensions, apron geometry, rim profile, bowl depth and drain position.
Actual Sink Verification
Inspect and measure the production sink before final cabinet and countertop cutting. Record any relevant dimensional or visible variation.
Design Service Load
Review sink self-weight, water at the agreed condition, garbage disposal, fixed accessories and defined use load. The responsible support designer or project professional shall confirm capacity and safety margin.
Cabinet Structure
Use a compatible sink base or reinforce the cabinet as required. Do not remove structural rails or front components without an approved replacement load path.
Bottom Support
Provide the specified platform, rails, brackets, frame or cradle. Support the approved bearing areas and maintain stable, distributed contact.
Apron Opening
Cut the cabinet front from the verified sink or approved model-specific template. Maintain the defined side and lower reveals without forcing the sink.
Apron Projection
Dimension apron projection from the stated finished cabinet-face plane and show its relationship to the finished countertop front edge. Confirm by dry fit.
Sink Elevation
Position the rim for the approved undermount, flush or built-up installation. Adjust the structural support—not the plumbing—to set elevation.
Countertop Interface
Fabricate the cutout and reveal from the approved sink position. Do not use the countertop as an unspecified substitute for cabinet support.
Surface Preparation and Sealing
Prepare sink and countertop surfaces according to the compatible sealant or adhesive instructions. Provide a continuous water-resistant joint.
Plumbing and Disposal
Install drains, disposal and waste pipe without vertical or lateral stress on the sink. Maintain service access and required clearances.
Final Inspection
Check support engagement, sink level, reveal, apron projection, cabinet-door clearance, seal continuity, plumbing stress and leaks. Retain installation photographs where required.
This template must be adapted to the exact sink, cabinet, countertop, support hardware and local project requirements.
Sample and Quality Inspection for B2B Buyers
Dimensional Checks
- Overall size
- Apron width and height
- Bowl depth
- Rim dimensions
- Drain coordinates
- Support-bearing geometry
Visual Checks
- Apron flatness and symmetry
- Corner condition
- Brushed direction or color consistency
- Weld and edge finish
- Scratches, dents, chips or cracks
Fit Checks
- Cabinet mock-up opening
- Support contact
- Apron projection
- Countertop reveal
- Door clearance
- Drain and disposal envelope
- Accessory fit
Packaging Checks
- Apron surface isolation
- Corner protection
- Sink-to-accessory separation
- Carton orientation
- SKU and left/right identification
- Pallet compression risk
The visible apron should receive stricter handling and inspection than a hidden sink underside.
Claims to Avoid
- “The countertop will hold the farmhouse sink.”
- “The apron supports the sink automatically.”
- “All farmhouse sinks should project by the same amount.”
- “A 33-inch sink fits every 33-inch cabinet.”
- “Stainless steel farmhouse sinks do not need support.”
- “Silicone is enough for any farmhouse sink.”
- “The drain pipe can help carry the bowl.”
- “Nominal dimensions are enough to cut fireclay.”
- “If the apron fits, the complete sink fits.”
- “One support frame works for every material and disposal.”
Accurate installation limits are more professional than universal claims.
Frequently Asked Questions
Does a farmhouse sink need support underneath?
Usually yes. The support should transfer the complete installed load into structural cabinet parts according to the exact sink and installation method.
Can the countertop hold a farmhouse sink?
Do not assume it can. The countertop joint and sink rim are not a replacement for a defined cabinet support system.
How far should a farmhouse sink stick out?
There is no universal projection. Follow the exact product drawing and define whether projection is measured from the cabinet face, door plane or countertop edge.
Should the apron be flush with the cabinet doors?
Not necessarily. The intended relationship depends on the sink design, cabinet face and countertop. Approve it with a side-view drawing or mock-up.
Does the apron carry the sink weight?
Only if the exact product and installation design explicitly assign it a structural role. Do not assume the visible panel is a support bracket.
Can I put a farmhouse sink in a standard cabinet?
Sometimes, especially with a short-apron retrofit model. A full apron may require major front modification and structural reinforcement.
Does a fireclay sink need more support than stainless steel?
It is generally heavier and more brittle, so distributed support and actual-sink measurement are especially important. Stainless steel still requires proper support.
Should the actual sink be on site before countertop templating?
Yes. It allows the cabinetmaker and fabricator to verify rim, apron, corner and dimensional details before permanent cuts.
What if the farmhouse sink rocks on the support?
Do not force it flat with the countertop or plumbing. Inspect the bearing surface, support level and approved adjustment method.
Can I use wooden shims?
Use only suitable, durable and approved adjustment components. Loose or moisture-sensitive shims can compress, move or deteriorate.
Does a garbage disposal need separate support?
Its weight should be included in the complete sink support design. The disposal must not become an unintended support or pull the drain out of alignment.
Can a farmhouse sink be undermounted?
Yes, many models use an undermount-style countertop relationship while the apron remains exposed. Others are flush, built-up or retrofit designs.
Why is there a gap between the apron and cabinet?
Possible causes include incorrect cutout, sink dimensional variation, cabinet out of square, poor centering or an undefined reveal.
Can I rotate a farmhouse sink?
Only if its design and instructions permit it. Rotation can affect apron geometry, drain location, workstation ledges, finish direction and support.
What is the biggest installation mistake?
Cutting the cabinet and countertop before confirming the actual sink, support height, apron projection and plumbing envelope.
Final Answer
A reliable farmhouse-sink installation solves three separate problems:
- Structural support: Transfers the loaded sink into the cabinet and floor.
- Geometric fit: Coordinates the apron, cabinet opening, doors and countertop.
- Water management: Seals the rim and protects cut cabinet edges from moisture.
The support should be designed for the complete service load, not only the empty sink. The apron should be positioned from defined cabinet and countertop reference planes, not from a borrowed universal projection.
Before cutting, confirm:
- Actual sink dimensions
- Sink material and loaded weight
- Approved bearing areas
- Cabinet structure
- Apron width and height
- Apron projection reference
- Rim elevation and reveal
- Countertop cutout
- Drain and garbage-disposal clearance
- Door and drawer relationship
For projects programs, approve the sink, cabinet mock-up, support concept, countertop relationship, plumbing envelope and packaging as one system.
Develop Farmhouse and Apron Front Sink Programs with Matrix
Matrix supports apron front sink programs for brands, importers, wholesalers, showrooms and project buyers.
Options and development support can include:
- Stainless steel and granite composite farmhouse sinks
- Single- and double-bowl configurations
- Workstation apron front sinks
- Center, rear and offset drain layouts
- Apron height and cabinet-opening review
- Bottom-support and installed-envelope planning
- Countertop cutout and reveal coordination
- Bottom-grid, strainer and accessory matching
- Brushed, black, PVD and composite finishes
- OEM/private-label packaging
- Apron surface and corner protection
- Sample approval and repeat-order control
Review the Matrix kitchen sink installation guides when coordinating cabinet, countertop, drain and accessories.
To discuss a farmhouse sink sample or OEM program, contact Matrix.