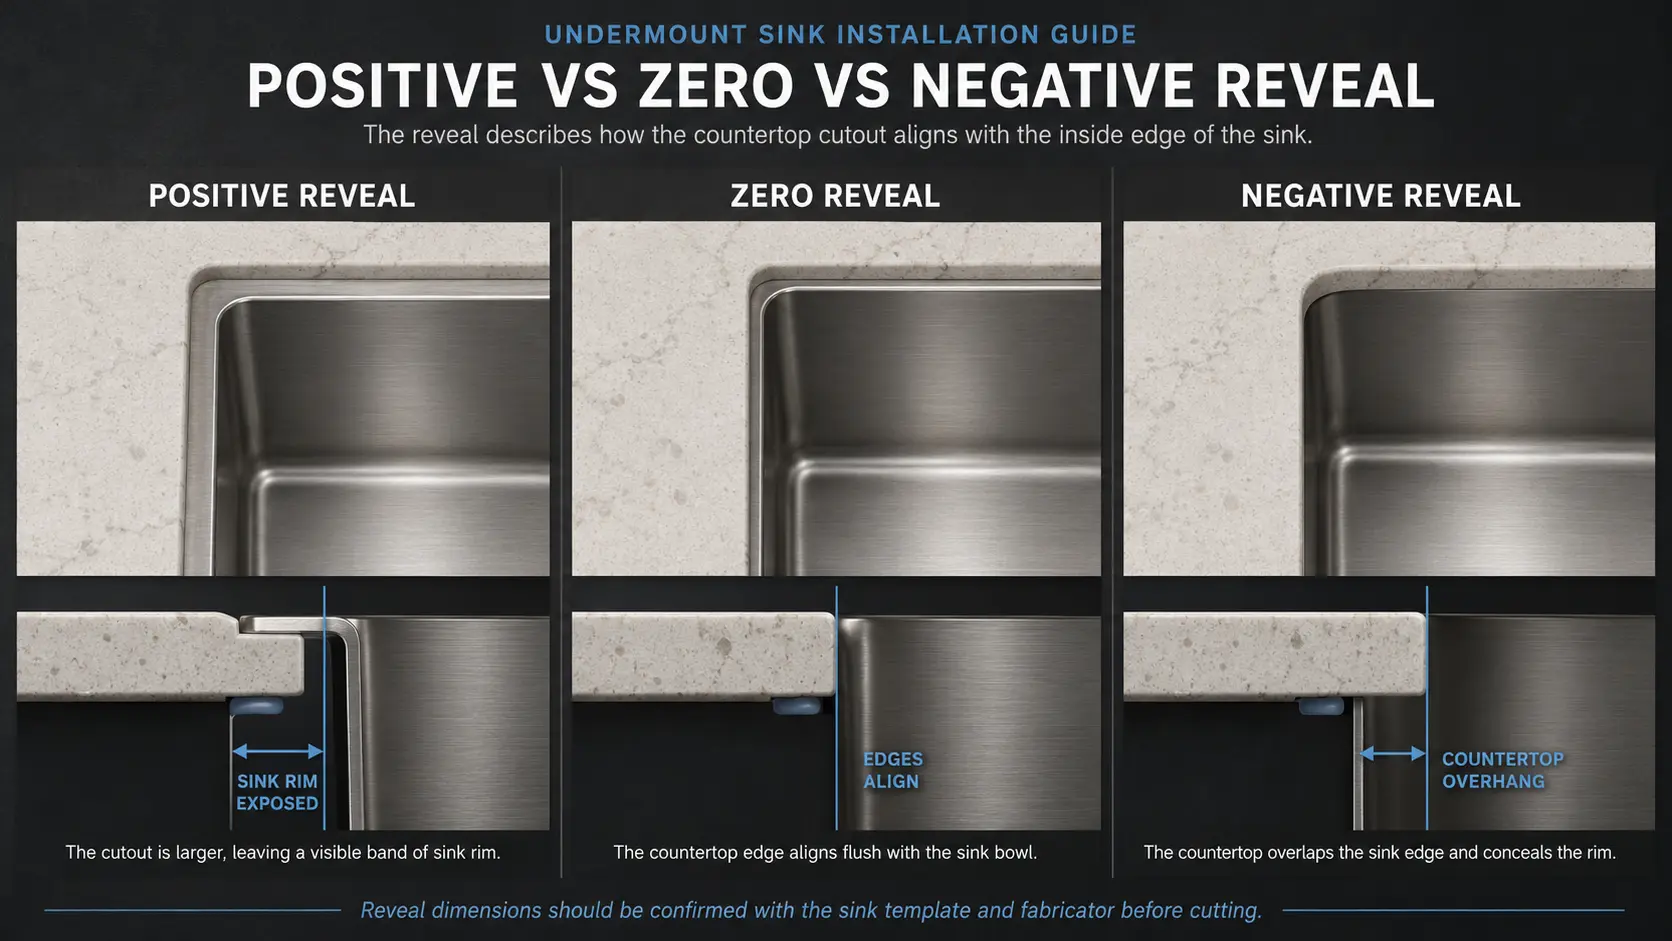
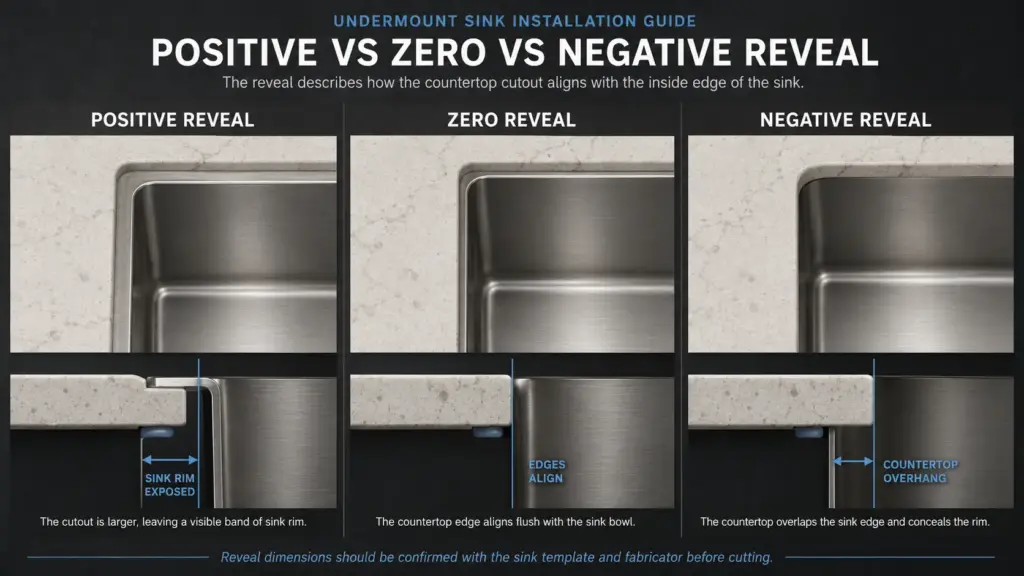
Positive, zero and negative reveal describe where the countertop edge finishes relative to the inside edge of an undermount sink bowl.
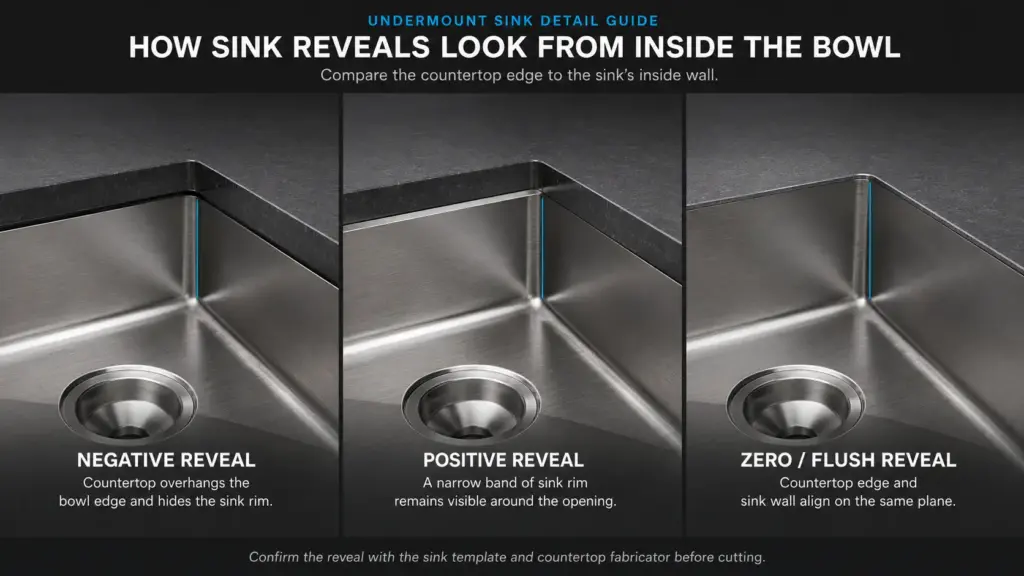
- Positive reveal: part of the sink rim remains visible.
- Zero reveal: the countertop edge aligns with the inside bowl wall.
- Negative reveal: the countertop extends over the bowl edge and hides the rim.
The best undermount sink reveal is not automatically the one that looks cleanest in a product photo. It is the one that works with the sink geometry, countertop material, cleaning preference, accessories, support system and replacement plan.
The Most Important Fact: Reveal Does Not Remove the Joint
Every undermount sink still has a sink-to-countertop joint below the worktop.
Changing the reveal only changes where that joint—and the surface around it—can be seen, touched and cleaned.
Positive reveal exposes the sink ledge. Zero reveal aligns the two visible edges. Negative reveal hides the rim beneath a countertop overhang.
This leads to three commonly misunderstood facts:
- Zero reveal is not seamless. The sink and countertop remain separate components.
- Negative reveal is not maintenance-free. The underside of the overhang still needs cleaning.
- Positive reveal is not an installation defect. It can be an intentional functional detail, especially when a sink ledge or accessory requires exposure.
Three Reveals, Seen as Cross-Sections
Imagine cutting through the countertop and sink and viewing them from the side.
Positive Reveal
Countertop edge → visible sink rim → bowl opening
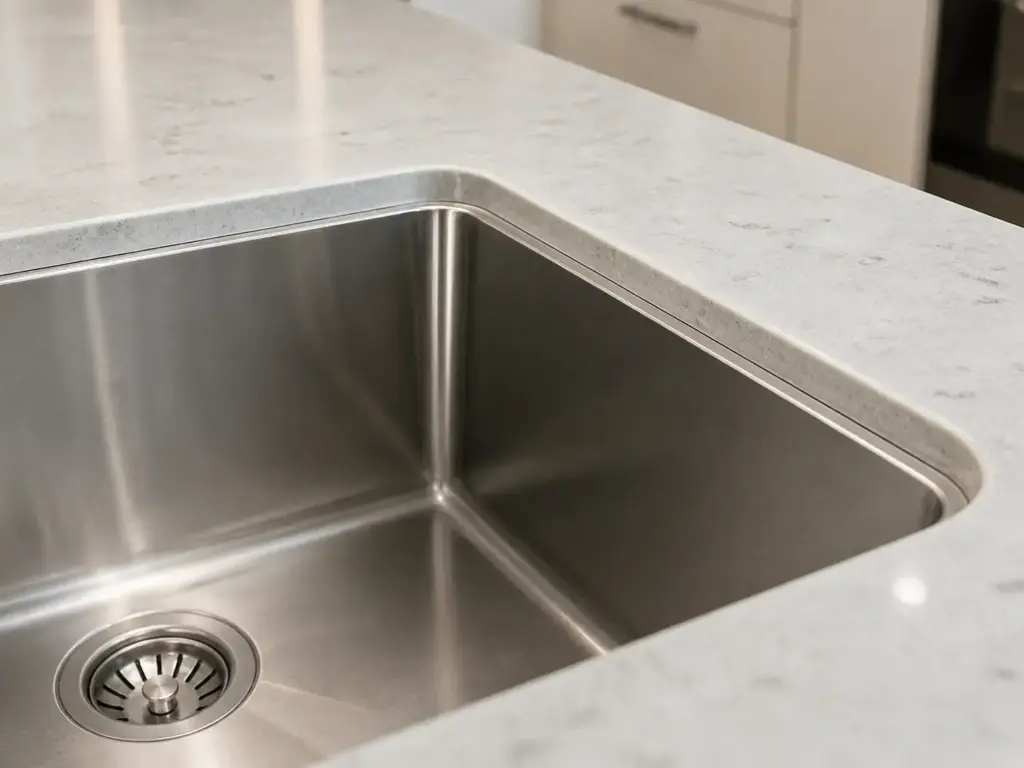
The countertop opening is larger than the top opening of the bowl. A controlled strip of sink rim is visible from above.
Zero Reveal
Countertop edge → aligned with the inside bowl wall
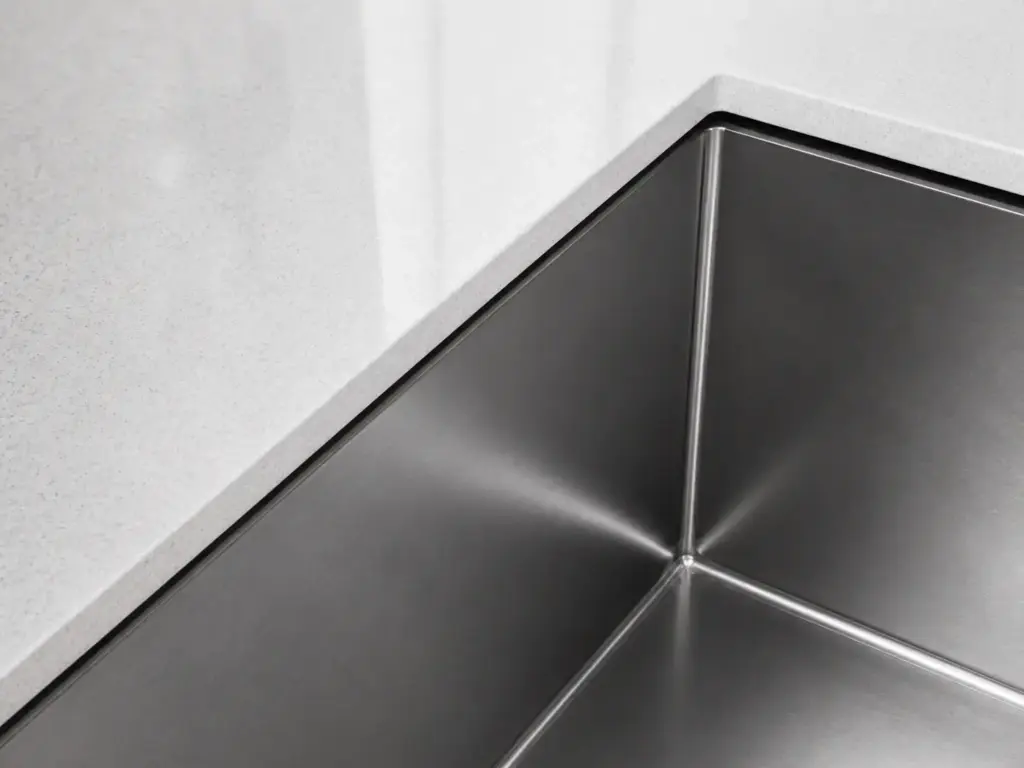
The countertop cutout follows the bowl opening as closely as the approved tolerances allow.
Negative Reveal
Countertop edge → overhang above bowl → hidden sink rim
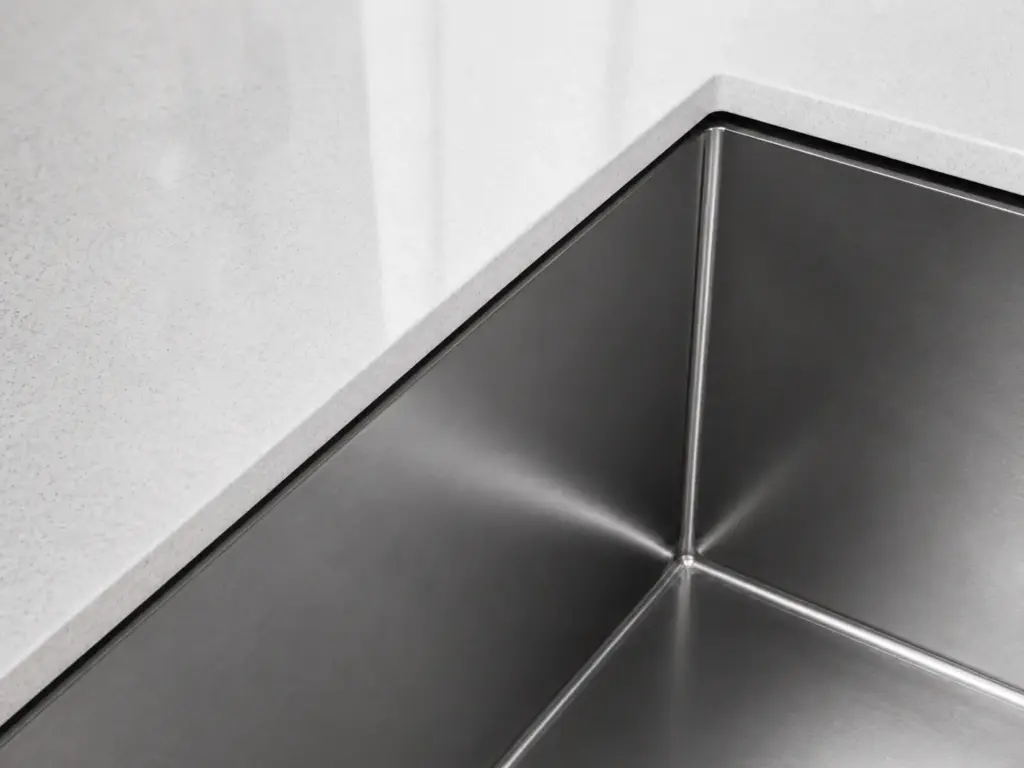
The countertop opening is smaller than the top bowl opening, so the countertop projects slightly into the bowl.
Reveal refers to the bowl opening. It does not describe farmhouse apron projection, sink depth, mounting height or the countertop overhang at the cabinet front.
Choose in 30 Seconds
| If this is your main priority | Start with | Check before approval |
|---|---|---|
| Visible and inspectable joint area | Positive reveal | Exposed rim finish and ledge cleaning |
| Minimal transition from counter to bowl | Zero reveal | Cutout, radius and sink-centering accuracy |
| Hide the sink rim | Negative reveal | Underside cleaning and accessory clearance |
| Workstation accessories | Model-specified reveal | Test every board, colander and rack |
| Fireclay or variable molded sink | Actual-sink templating | Dimensional and straightness variation |
| Easy future replacement | Documented, repeatable cutout | Bowl opening, rim width and corner match |
| Multi-project or private-label program | Controlled nominal reveal with tolerance | Drawing revision and batch consistency |
This table identifies a starting point, not a universal specification. The approved model drawing and actual sink must take priority.
A Better Way to Compare: Where Does the Cleaning Zone Move?
The three reveals do not eliminate cleaning. They relocate it.
| Reveal | Surface most exposed to residue | What the user must clean |
| Positive | Horizontal sink rim | Visible ledge and seal transition |
| Zero | Narrow counter-to-bowl alignment line | Joint line and any local mismatch |
| Negative | Underside of countertop overhang | Hidden underside edge and seal area |
Positive Reveal: Visible Dirt, Easier Inspection
Crumbs and water can remain on the exposed rim. The benefit is that the user can see the ledge and inspect the joint without reaching beneath an overhang.
Zero Reveal: Less Ledge, More Precision
When the cutout and bowl align correctly, there is little horizontal surface to collect residue. If the sink shifts or the corner radii do not match, however, a narrow irregular lip can appear.
Negative Reveal: Clean from Above, Hidden Below
Crumbs can be wiped from the countertop into the sink without crossing an exposed sink rim. The tradeoff is an underside edge that is outside the normal line of sight.
Therefore, no reveal should be marketed as automatically “hygienic” or “bacteria-free.” Joint continuity, support, moisture exposure and cleaning behavior matter more than the label.
Positive Reveal: When Showing the Rim Makes Sense
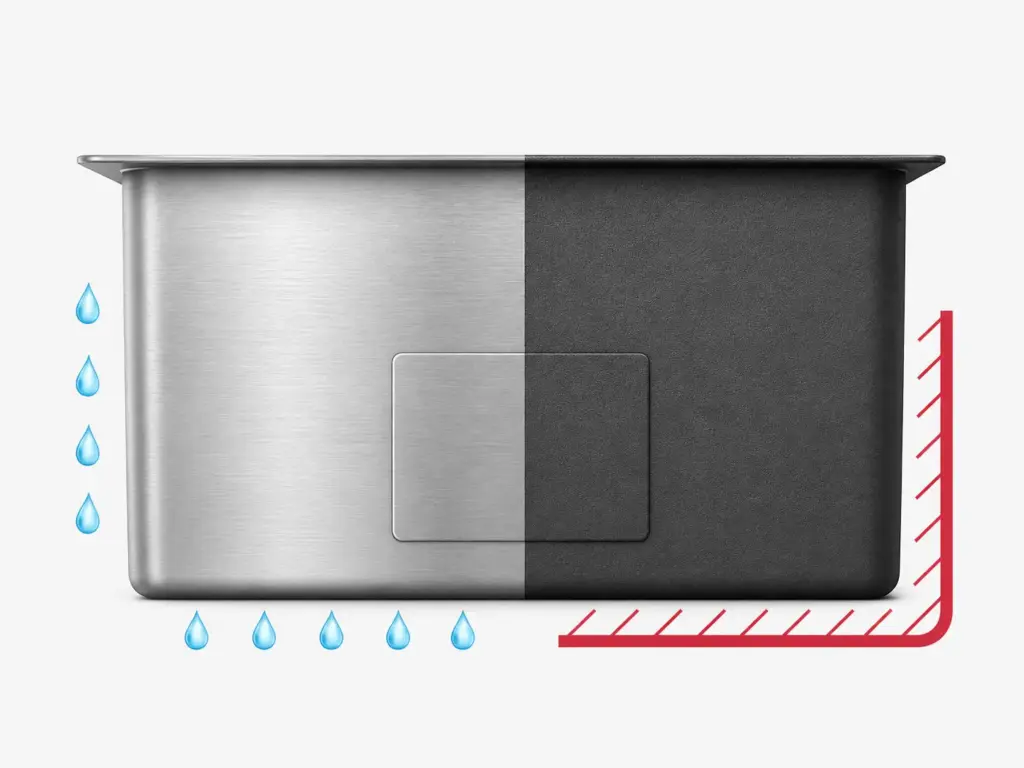
A positive reveal deliberately exposes part of the sink rim.
Where It Performs Well
- The sink rim has a consistent, finished appearance.
- The user prefers a visible, accessible cleaning surface.
- The countertop should not project into the bowl opening.
- A workstation ledge or accessory requires a defined exposed area.
- The project team wants the joint to remain inspectable from above.
Where It Can Fail
- The reveal width varies from side to side.
- The exposed rim has an unfinished or inconsistent grain.
- The ledge is wider than expected and catches residue.
- The sink corner and countertop corner do not follow the same visual path.
- The seal line is irregular or the sink moves after installation.
The Counterintuitive Advantage
Positive reveal is often criticized because the ledge is visible. Visibility can also be useful: water, residue or seal deterioration is easier to notice than beneath a negative overhang.
For a stainless steel sink, a positive reveal places additional quality demands on the rim. Rim flatness, edge consistency, weld blending and surface direction are no longer hidden installation details; they become part of the finished kitchen.
Zero Reveal: The Simplest Look, the Tightest Coordination
Zero reveal is frequently described as the cleanest visual option. It is also the least forgiving.
The target is simple: the finished countertop edge should align with the top inside edge of the bowl. Achieving that line requires several independent dimensions to agree.
A Successful Zero Reveal Depends On
- Actual bowl-opening dimensions
- Bowl position relative to the mounting rim
- Front, rear and side-wall straightness
- Sink corner radii
- Countertop cutout geometry
- Edge-polishing allowance
- Sink centering during bonding
- Movement control while the adhesive or sealant cures
A sink shifted slightly to the left can show positive reveal on one side and negative reveal on the other. The cutout may be dimensionally correct, yet the installed result is no longer zero.
Why Corners Expose Errors First
Straight sections can align while corners still look inconsistent. This happens when:
- The countertop radius and bowl radius differ.
- The sink is rotated or positioned diagonally.
- The fabricated bowl corners vary slightly.
- The cutout was offset from the wrong reference.
- Polishing altered the visible edge line.
For R0, R10 and R15 handmade sinks, the drawing should show the intended corner transition—not only overall cutout length and width.
Zero Is a Target, Not a Complete Tolerance
Writing “zero reveal” on a purchase order is not enough for repeat production.
A professional specification should define:
- What edge is used as the datum
- Where reveal is measured
- The permitted positive or negative deviation
- How corners are evaluated
- How double-bowl dividers are treated
- Whether the actual sink must be checked before cutting
Without an agreed tolerance, a countertop fabricator, sink supplier and project inspector can all interpret “flush” differently.
Negative Reveal: A Hidden Rim Creates a New Functional Edge
Negative reveal allows the countertop to extend past the inside bowl edge and conceal the sink rim.
Where It Performs Well
- The design should visually emphasize the countertop.
- The sink rim should not remain visible.
- Users want to wipe crumbs directly from countertop to bowl.
- A modest overhang can conceal small cosmetic variation in the rim.
- The model and accessories permit the reduced opening.
The Hidden Tradeoffs
The underside of the countertop overhang is exposed to:
- Water splash
- Grease and food residue
- Impact from pans or trays
- Sealant deterioration
- Cleaning chemicals
The visible top surface may look minimal while the working surface below becomes harder to inspect.
More Overhang Is Not Better
An excessive negative reveal can:
- Reduce the usable bowl opening
- Obstruct large cookware
- Interfere with bottom-grid removal
- Block workstation accessories
- Increase impact risk at the countertop edge
- Leave insufficient accessible rim for mounting or sealing
Negative reveal should therefore be a controlled model-specific dimension, not an installer’s attempt to hide an inaccurate cutout.
The Workstation Exception: Accessories Can Decide the Reveal
For an ordinary bowl, reveal is often a balance of appearance, cleaning and fabrication.
For a workstation sink, reveal can determine whether the product functions as designed.
Cutting boards, colanders, drying racks and sliding trays need specific support surfaces and clearances. Depending on the sink structure, the accessory may rest on:
- An internal bowl ledge
- A rim-level platform
- A semi-exposed upper ledge
- A combination of the sink and countertop geometry
That means no blanket rule such as “all workstation sinks need zero reveal” or “all workstation sinks need positive reveal” is reliable.
Before cutting the countertop:
- Identify where each accessory is intended to rest.
- Check the approved reveal on the model drawing.
- Dry-fit the actual cutting board, colander and rack.
- Verify that a countertop overhang does not block movement.
- Confirm that the accessory can still be removed after installation.
Matrix develops workstation kitchen sinks with model-matched ledges and accessories. The sink, cutout and accessory package should be reviewed as one system.
The Geometry Behind the Cutout
Do not calculate reveal from the sink’s overall outside dimensions. Outside dimensions include the mounting rim, which is partly hidden below the countertop.
For reveal planning, use the top bowl opening as the primary reference.
For a centered rectangular bowl with straight parallel sides:
- Positive reveal r on each side: cutout width is approximately bowl-opening width + 2r.
- Zero reveal: cutout follows the bowl opening.
- Negative reveal r on each side: cutout width is approximately bowl-opening width − 2r.
The same relationship can be used for length as an initial planning check.
It is not a fabrication instruction because real sinks may include:
- Different front and rear reveal requirements
- Rounded or tapered bowl walls
- Offset drains or divided bowls
- Workstation ledges
- Asymmetrical accessory rails
- Nonuniform corner transitions
- Edge-polishing allowances
- Manufacturing tolerances
Many installation templates show nominal reveals such as 1/8 or 1/4 inch, but these are examples—not universal sink-industry rules. Use the value approved for the exact model.
Why the Actual Sink Can Matter More Than the Paper Template
A template is useful only when it matches:
- The exact model
- The correct product revision
- The intended reveal
- The actual production geometry
- The current accessory configuration
Before countertop fabrication, place the template over the actual sink and check the relationship around the full perimeter.
Actual-sink verification is especially important for:
- Fireclay and ceramic sinks
- Granite composite sinks
- Large handmade stainless steel sinks
- Double-bowl models
- Workstation sinks
- Replacement installations
- Projects requiring zero reveal
The sink should not be forced to match a cutout after the countertop has already been fabricated.
Material Changes the Reveal Risk
Stainless Steel Sinks
Stainless steel rims can be relatively thin and repeatable, but handmade construction introduces variables such as rim flatness, bowl-wall position, welded-corner blending and spring-back.
- Positive reveal makes the exposed rim finish important.
- Zero reveal makes bowl position and corner repeatability important.
- Negative reveal makes rim width and hidden support space important.
Granite Composite Sinks
Molded walls and radii may be thicker than stainless steel. Confirm the actual top bowl opening and do not assume a stainless sink cutout logic will transfer directly.
Fireclay and Ceramic Sinks
Firing can create dimensional, straightness and symmetry variation. The actual sink should be available before templating whenever possible, particularly for a visually tight zero reveal.
Cast Iron and Enameled Sinks
Heavy weight, wall thickness and enamel edge condition must be considered. Reveal does not reduce the need for a properly designed support system.
Countertop Material Changes the Edge Strategy
Reveal determines how much of the countertop cutout edge and underside are exposed to use.
Natural Stone
Veins, fissures and corner geometry can affect cutout durability. The exposed edge must be fabricated and finished professionally.
Engineered Quartz
Consistent slab characteristics help repeatability, but the sink opening still needs appropriate edge finishing, corner planning and mounting coordination.
Porcelain and Sintered Stone
Thin or brittle edge conditions require material-specific fabrication. A negative overhang should be assessed for edge impact and accessory clearance.
Solid Surface
This material may allow controlled transitions, depending on the approved fabrication system and sink combination.
Wood or Laminate
The cutout and underside face repeated moisture exposure. Confirm that the material, substrate and edge-sealing method are suitable for undermount use.
The reveal cannot compensate for an unsuitable countertop or inadequately protected cutout.
Reveal Is Not the Sink Support System
The sink should remain safely supported when it is full of water, cookware and—where fitted—a garbage disposal.
The intended load path is:
Loaded sink → clips, brackets, rails, harness or frame → approved countertop or cabinet structure
Positive, zero and negative reveal can all be structurally sound when the mounting system is correct. None of them determines:
- Anchor type
- Clip spacing
- Adhesive capacity
- Cabinet reinforcement
- Disposal vibration resistance
- Allowable service load
A negative countertop overhang must not be treated as a shelf that holds up the sink. Silicone also should not be confused with an independent structural support design.
Review Matrix undermount kitchen sinks and installation guidance when coordinating cutouts, rim width, mounting and sealing.
A Five-Question Decision Method
1. Does the Model Require a Specific Reveal?
Check the cutout drawing, installation guide and accessory instructions first. A model requirement outranks aesthetic preference.
2. Does the Sink Have Functional Accessories?
If yes, test them on the actual sink and identify their support surfaces before approving the cutout.
3. Which Surface Would the User Prefer to Clean?
- Visible sink rim: positive
- Narrow aligned transition: zero
- Hidden countertop underside: negative
4. Can the Geometry Be Repeated Reliably?
Zero reveal demands the strongest coordination among sink manufacturing, countertop machining and installation positioning.
5. What Happens When the Sink Needs Replacement?
The future model must match the existing cutout, bowl opening, corner radii, rim width, cabinet and support space. Documenting the reveal now reduces uncertainty later.
For Homeowners: What to Approve Before the Countertop Is Cut
Ask to see or confirm:
- The actual sink model
- Positive, zero or negative reveal
- Expected reveal dimension
- Corner shape and radius
- Faucet and soap-dispenser clearance
- Workstation accessory operation
- Bottom-grid removal
- Cabinet and plumbing clearance
- Sink support method
- A dry-fit photograph if the sink is not on site
Do not approve the countertop using only a generic image of the desired reveal. The final appearance depends on the actual sink and cutout geometry.
For B2B Buyers: Treat Reveal as a Controlled Interface
For brands, wholesalers, cabinet programs and project suppliers, reveal connects three production systems:
- Sink manufacturing
- Countertop fabrication
- Site installation
If each party works from a different dimension or drawing revision, the components may be individually “within specification” while the completed reveal still fails.
Add These Fields to the RFQ or Specification Sheet
| Specification field | Why it matters |
| Sink outer dimensions | Confirms cabinet and mounting-rim envelope |
| Top bowl-opening dimensions | Establishes the reveal reference |
| Rim width | Confirms sealing and mounting space |
| Rim flatness requirement | Reduces gaps and unstable alignment |
| Bowl position relative to rim | Controls reveal consistency |
| Corner radius and transition | Prevents mismatched corners |
| Reveal type | Defines positive, zero or negative relationship |
| Nominal reveal | States the intended visible dimension |
| Reveal tolerance | Defines acceptable variation |
| Cutout dimensions | Coordinates countertop fabrication |
| Drawing/DXF revision | Prevents obsolete files from being used |
| Accessory-clearance requirement | Protects workstation functionality |
| Inspection points | Makes QC repeatable |
A Better Purchase-Order Statement
Avoid writing only:
Undermount sink, zero reveal.
Use a controlled statement such as:
Countertop cutout to align with the approved top bowl-opening reference. Reveal to be inspected at the center of all four straight sides and at each corner transition. Use drawing revision ___ and verify the actual sink before countertop cutting.
The final tolerance should be agreed by the sink supplier, countertop fabricator and project team rather than copied from an unrelated product.
Reveal Approval Card
Use this record before cutting or bulk approval.
Sink information
- Model/SKU:
- Material:
- Bowl configuration:
- Drawing revision:
- Actual sink checked: Yes / No
Reveal decision
- Positive / Zero / Negative:
- Nominal reveal:
- Permitted variation:
- Front:
- Rear:
- Left:
- Right:
- Corner treatment:
Countertop information
- Material:
- Thickness:
- Cutout edge profile:
- Fabricator:
Accessory check
- Cutting board fitted:
- Colander fitted:
- Drying rack fitted:
- Bottom grid removable:
Installation check
- Mounting system:
- Sealing system:
- Cabinet clearance confirmed:
- Approved by:
- Approval date:
Quality-Control Checkpoints for a Finished Installation
Visual Inspection
- Reveal remains consistent on straight sides.
- Corner transitions look intentional.
- The sink is not rotated or offset.
- No unfinished rim is unintentionally visible.
- The countertop edge is free of visible chips.
Joint Inspection
- The seal is continuous around the perimeter.
- There are no visible gaps or voids.
- The sink does not move under normal loading.
- Sealant has not been used to disguise a support problem.
Functional Inspection
- Workstation accessories sit on their intended ledges.
- Boards and colanders can slide or lift out normally.
- The bottom grid can be removed.
- Large cookware is not obstructed by the overhang.
- Faucet, drain and disposal clearances remain usable.
Diagnose the Problem from the Reveal
| What you see | Most likely cause | What to check first |
| Positive on one side and negative on the other | Sink shifted or centerlines mismatch | Sink position and cutout datum |
| Straight sides align but corners do not | Radius mismatch or diagonal rotation | Corner drawing and sink orientation |
| Exposed ledge is wider than approved | Wrong cutout or reveal template | Template revision and bowl-opening reference |
| Dark residue under the counter edge | Hidden moisture, residue or failed seal | Negative-overhang underside and seal continuity |
| Cutting board no longer fits | Countertop intrudes into accessory path | Approved workstation reveal |
| Rim finish looks inconsistent | Hidden surface became visible | Positive-reveal finish specification |
| Countertop chips around the opening | Edge, material, impact or fabrication issue | Cutout edge and corner geometry |
| Seal repeatedly cracks | Sink movement or inadequate support | Mounting system and load path |
| Replacement sink cannot be secured | Cutout, bowl or rim mismatch | Existing opening and new rim width |
Do not solve a moving or unsupported sink by simply adding more sealant. Correct the underlying support or geometry problem.
Frequently Asked Questions
What is an undermount sink reveal?
It is the relationship between the countertop cutout edge and the top inside edge of the sink bowl.
Which is best: positive, zero or negative reveal?
There is no universal best reveal. Positive is visible and inspectable, zero creates a precise aligned transition, and negative hides the rim. The sink model, accessories, cleaning preference and fabrication capability should decide.
Which undermount sink reveal is easiest to clean?
An accurately installed zero reveal minimizes the horizontal ledge. Positive reveal is easier to inspect from above. Negative reveal allows easy countertop wiping but requires cleaning beneath the overhang.
Is zero reveal completely seamless?
No. The sink and countertop remain separate parts with a sealed joint. Zero reveal aligns the visible edges but does not eliminate the joint.
Does a negative reveal support the sink?
No. The sink requires an approved mounting system or cabinet-supported structure independently of the reveal.
How much reveal should an undermount sink have?
Use the dimension stated for the exact sink and cutout. Common template examples are not universal standards, and workstation models may require a special relationship.
Is positive reveal bad for hygiene?
Not automatically. The exposed ledge can collect residue, but it is visible and accessible for cleaning. Joint quality and maintenance matter more than the reveal label alone.
Can negative reveal stop workstation accessories from fitting?
Yes. If the countertop overhang enters the accessory support or movement area, cutting boards, colanders and racks may not fit. Confirm the exact model before cutting.
Why is my zero reveal uneven?
The sink may have shifted, the cutout may be off-center, or the bowl and countertop corner radii may not match.
Should the actual sink be available before countertop templating?
Yes whenever possible, especially for workstation, handmade, composite, fireclay, double-bowl and zero-reveal installations.
Can the reveal be changed after the countertop is cut?
Usually only to a limited extent. Altering a finished stone or engineered-surface cutout may be difficult, unsafe or visually unacceptable. Decide and document the reveal before fabrication.
Which reveal is easiest for future sink replacement?
No reveal guarantees easy replacement. Compatibility depends on the existing cutout, bowl opening, corner geometry, hidden rim width, cabinet space and mounting system. Retain the original drawing and model information.
Final Recommendation
Choose positive reveal when the project benefits from:
- A visible and inspectable sink rim
- No countertop intrusion into the bowl
- A deliberate sink-to-countertop material transition
- Model-specific access to a workstation ledge
Choose zero reveal when the project can deliver:
- Precise sink and cutout alignment
- Controlled corner geometry
- Minimal horizontal ledge
- Repeatable fabrication and installation
Choose negative reveal when the project requires:
- A concealed sink rim
- A countertop-dominant appearance
- Easy wiping from the countertop into the bowl
- A model-approved, modest overhang
Before approval, answer four questions:
- Does the exact sink allow this reveal?
- Will every accessory still work?
- Can the fabricator reproduce the required geometry?
- Has the reveal been documented for installation and replacement?
The best reveal is not simply a style choice. It is a controlled interface between the sink, countertop, accessories and installation system.
Develop Undermount Sink Programs with Matrix
Matrix supports undermount sink development for kitchen brands, wholesalers, importers, project buyers and private-label programs.
Program support can include:
- Stainless steel and granite composite sink options
- Positive, zero and negative reveal planning
- Bowl-opening and rim-dimension review
- Cutout drawing coordination
- Corner-radius and rim-flatness review
- Workstation ledge and accessory matching
- Mounting and installation guidance
- OEM packaging and documentation
- Drawing revision and repeat-order control
Explore Matrix undermount kitchen sinks, review the installation guides, or contact Matrix to discuss a sink, cutout or private-label program.