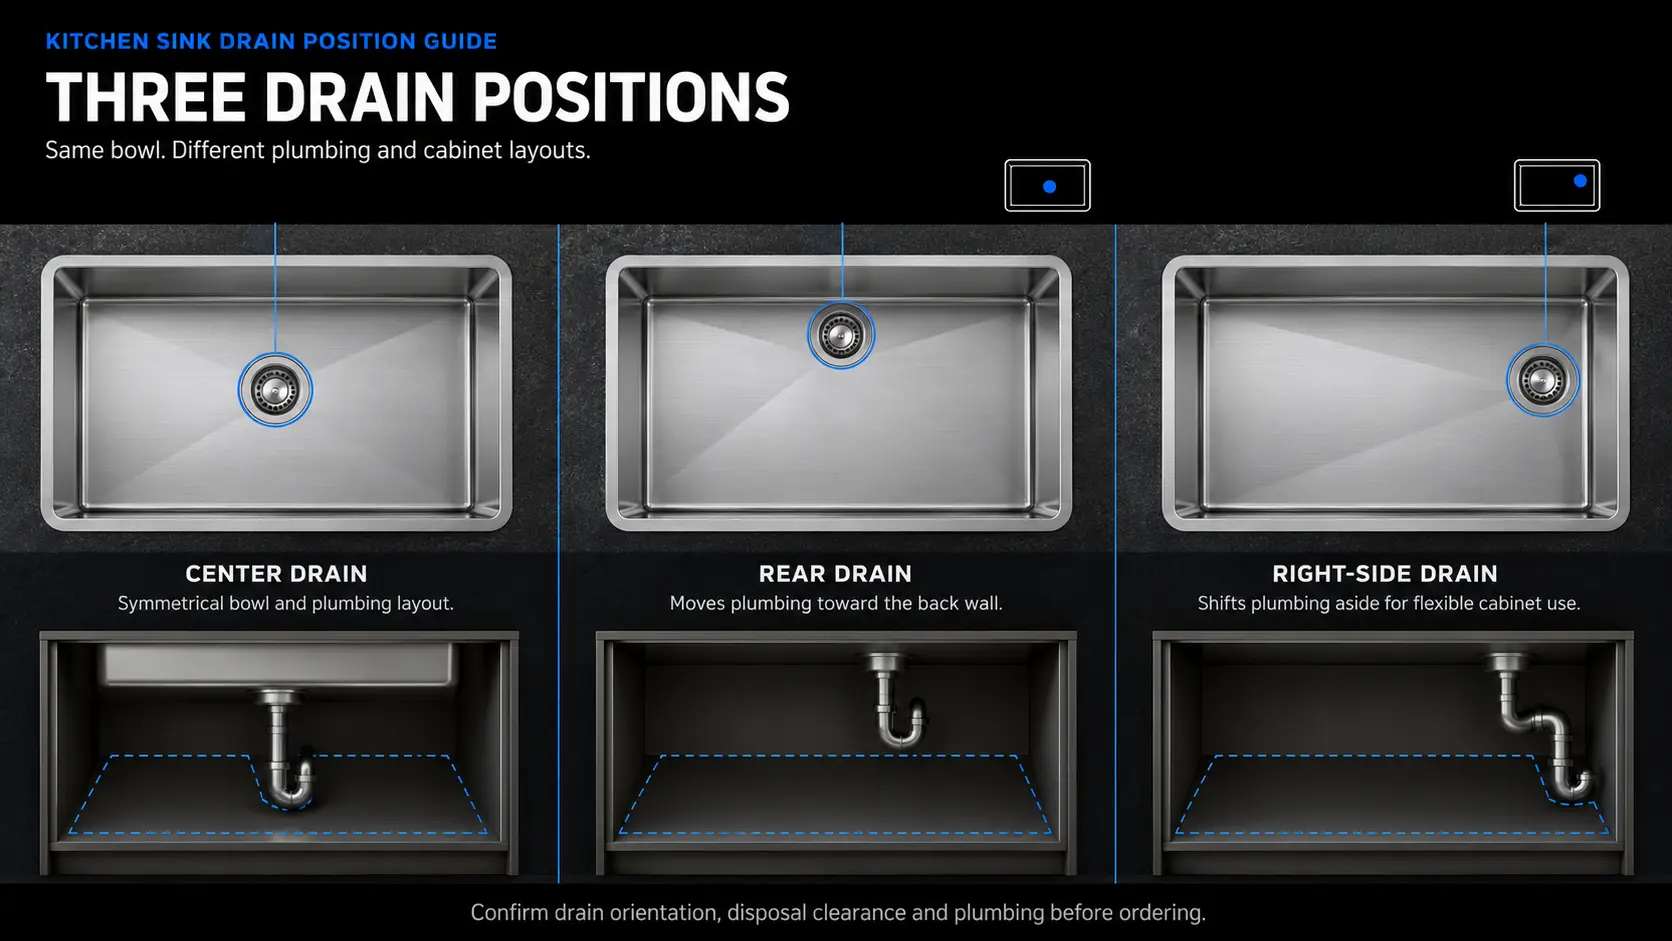
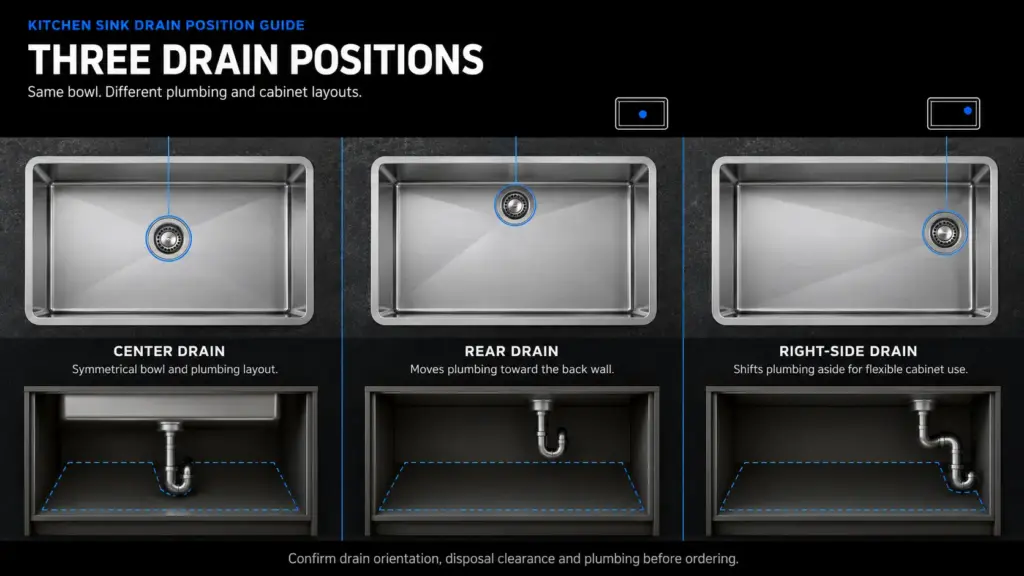
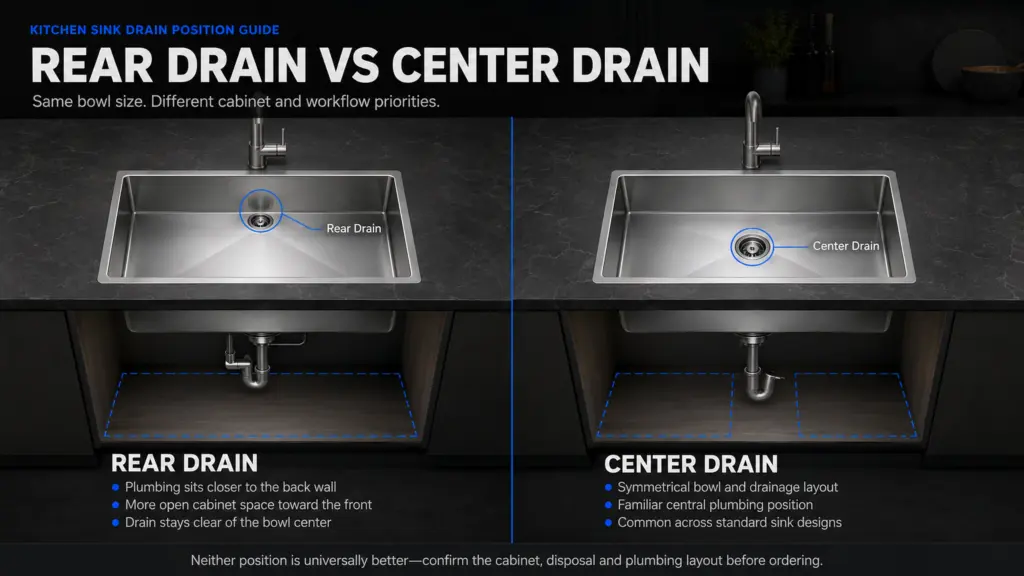
A rear drain is usually the better choice when you want more usable cabinet space, room for a pull-out waste bin or less plumbing near the front of the cabinet.
A center drain is often better for straightforward replacement, easy strainer access and existing plumbing located near the cabinet center. Neither drain position is inherently faster. The sink floor, drain fitting, garbage disposal, P-trap, waste-pipe route and installation determine actual drainage performance.
The practical rule is:
Choose the drain position from the cabinet and plumbing plan—not from the sink photo alone.
- A rear drain can be an excellent space-saving feature in a planned kitchen and an expensive complication in an unmeasured replacement.
- A center drain can be simple and reliable but may occupy the most valuable part of the sink cabinet.
Rear Drain vs Center Drain: Quick Answer
| Decision factor | Rear drain | Center drain |
|---|---|---|
| Front cabinet space | Usually better | Usually more obstructed |
| Pull-out bins or drawers | Easier to plan when plumbing is coordinated | Central plumbing often conflicts |
| Existing centered rough-in | May require rerouting | Often easier to connect |
| Garbage disposal | Can free central space but may hit the rear wall | Often has more space around its body |
| Large cookware in bowl | Less likely to cover the drain | Large pans may sit directly over the drain |
| Strainer access | Farther to reach in a deep bowl | Usually easier to reach |
| Drainage speed | Depends on bowl and plumbing design | Depends on bowl and plumbing design |
| Bottom grid | Requires rear-positioned opening | Requires centered opening |
| Accessible knee-space planning | Can help move plumbing rearward | May intrude farther into front knee space |
| Like-for-like replacement | Requires full measurement | Often simpler if replacing a center drain |
| Best use case | New or coordinated kitchen design | Simple retrofit or symmetrical compact sink |
Best Overall Choice
- Choose a rear drain for a planned new kitchen, large single bowl, workstation sink, organized cabinet or accessible open-base design.
- Choose a center drain for a simple replacement, compact sink or cabinet where central plumbing does not interfere with storage.
- Choose a rear-offset drain when you want to preserve one side of the cabinet for a pull-out bin, filter or other equipment.
All three choices require plumbing and accessory verification.
What Counts as a Rear Drain?
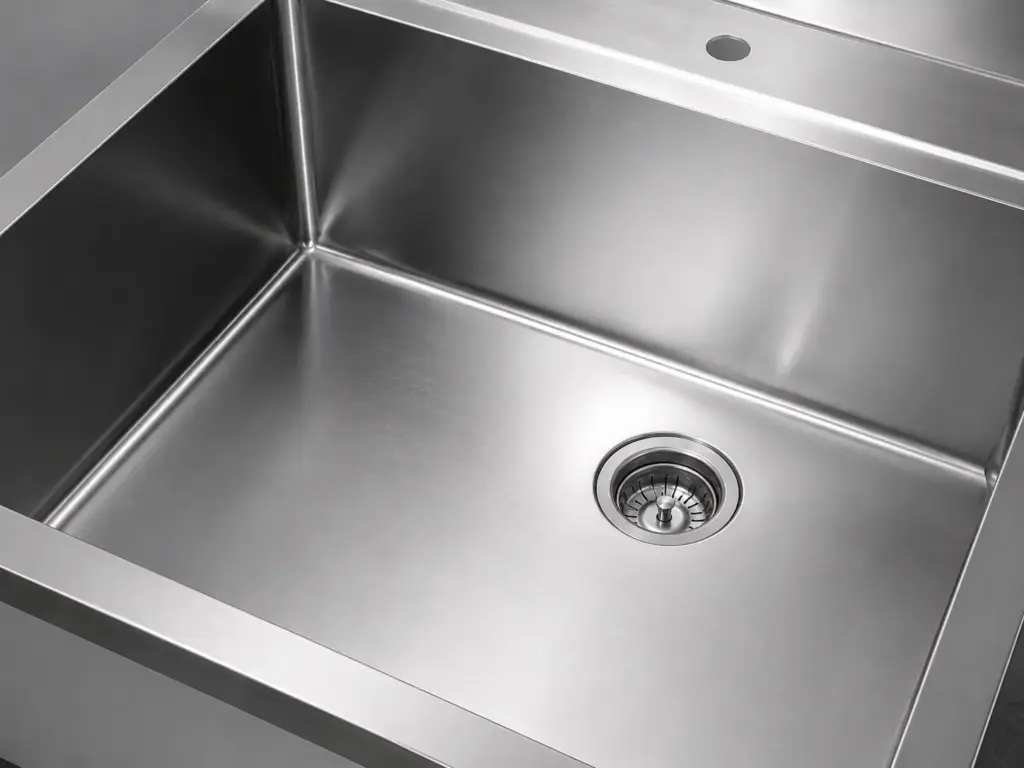
A rear drain places the sink outlet closer to the rear wall of the bowl. It may still be centered from left to right.
Common descriptions include:
- Rear-center drain: Rearward but centered left to right
- Rear-left drain: Rearward and toward the user’s left
- Rear-right drain: Rearward and toward the user’s right
- Rear-offset drain: Rearward and intentionally shifted to one side
“Rear drain” and “offset drain” are not exact synonyms. A rear-center drain is not offset from the left-to-right centerline.
For drawings and purchase orders, left and right must be defined from a stated viewing direction—normally from the user standing in front of the installed sink.
What Is a Center Drain?
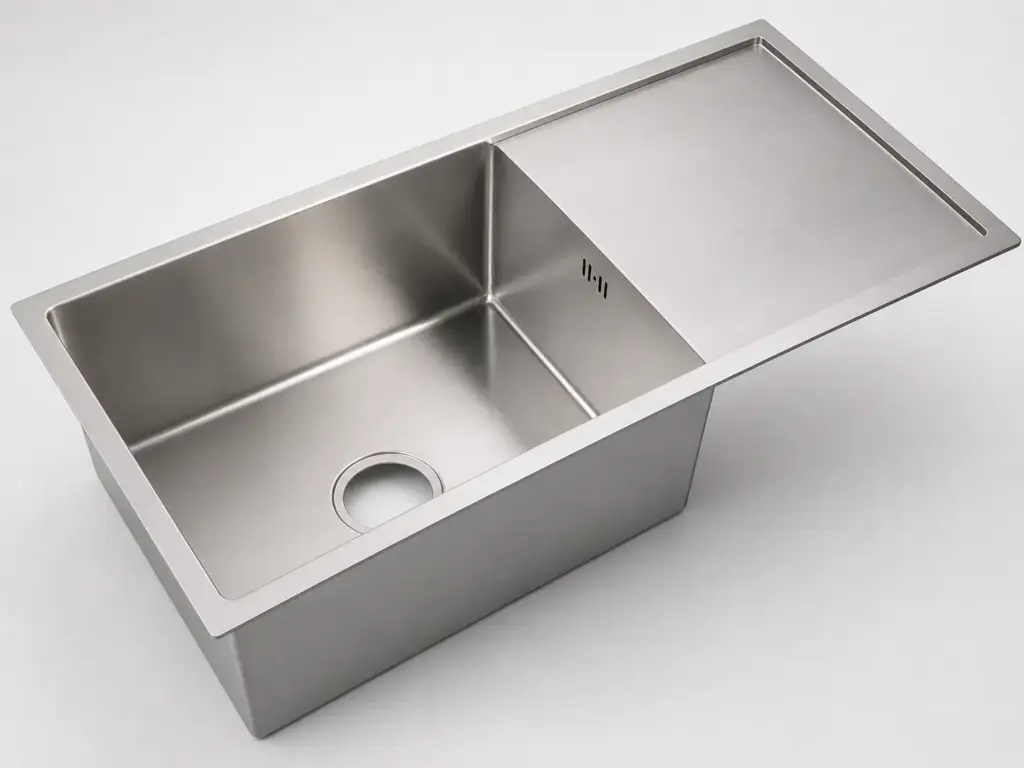
A center drain places the outlet near the geometric center of the bowl.
This creates a visually balanced layout and usually provides a shorter average travel distance from the bowl edges to the outlet. However, short travel distance does not guarantee fast drainage if the bowl has low spots, the drain flange sits high or the pipework is restricted.
A center drain also does not guarantee direct alignment with the wall drain. The bowl outlet, P-trap and plumbing rough-in are three different locations that must work together.
The Professional Way to Understand Drainage: Two Connected Systems
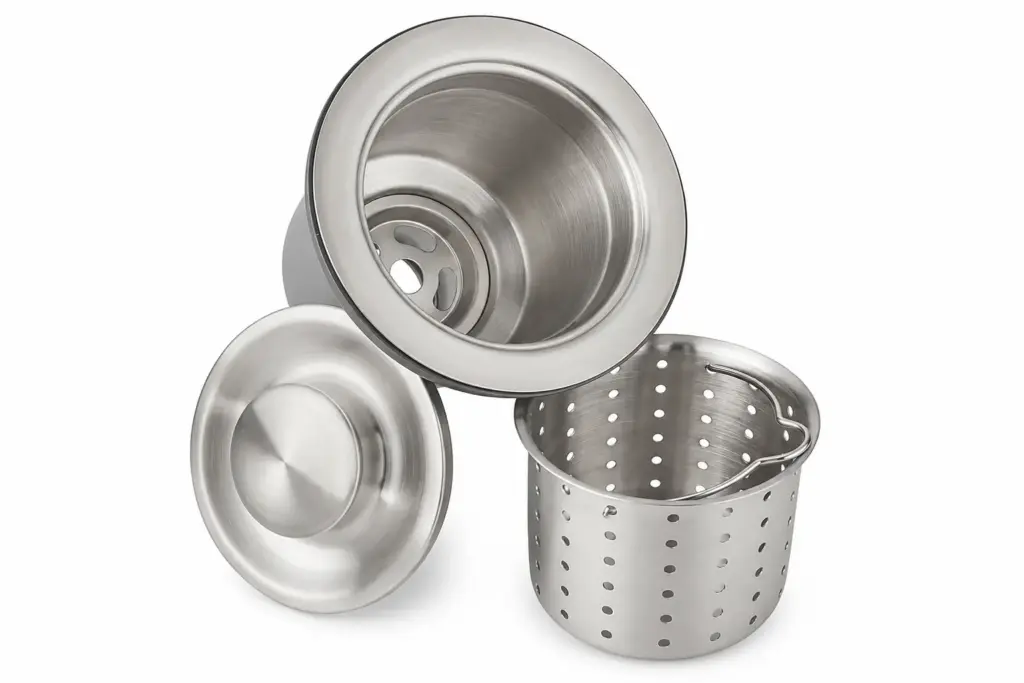
Many comparisons fail because they treat “drainage” as one feature. A kitchen sink actually relies on two connected systems.
System 1: Surface Drainage Inside the Sink
This moves water across the bowl floor into the outlet.
It depends on:
- Direction and consistency of the bowl slope
- Local flatness and low spots
- Drain recess geometry
- Drain-flange height
- Sink installation level
- Surface texture and surface tension
- Bottom grid, cookware and food residue
System 2: Plumbing Drainage Below the Sink
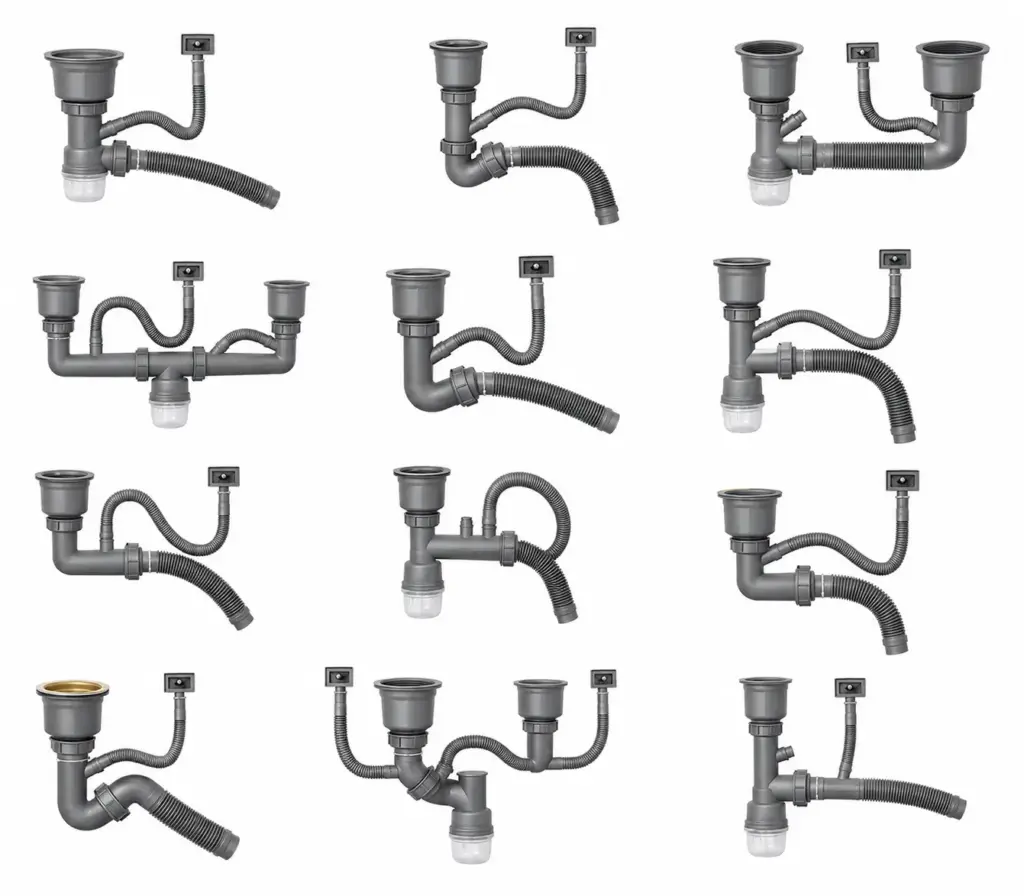
This moves water from the outlet through the drain assembly and sanitary piping.
It depends on:
- Strainer or garbage-disposal opening
- Tailpiece or disposal discharge
- P-trap arrangement
- Horizontal waste-pipe slope
- Approved changes in direction
- Venting
- Pipe condition and blockage
- Wall or floor rough-in location
Rear versus center drain changes where these systems begin. It does not determine the quality of either system by itself.
Does a Center Drain Empty Water Faster?
Not necessarily.
A center drain can create a shorter average water path, and a properly formed bowl may slope inward from several directions. That can be effective.
But the theoretical advantage disappears when:
- The sink is not installed level.
- The drain flange projects above the bowl floor.
- The bowl has a low spot away from the drain.
- A pot or stack of dishes covers the outlet.
- The strainer or plumbing is restricted.
Drain location should never be used as a substitute for a drainage test.
Does a Rear Drain Leave More Water in the Sink?
It should not when the bowl is designed and installed correctly.
A rear-drain bowl requires a controlled path from the front and sides toward the rear outlet. In a large rectangular sink, this path may be longer than the path to a center drain, so floor geometry and flatness become especially important.
Water remaining in the bowl can come from:
- Insufficient front-to-rear slope
- A local low area
- Sink or countertop installation out of level
- A high drain flange
- Surface tension around droplets
- Debris or cookware interrupting flow
Scattered droplets or a thin water film are not the same as a defined puddle. Stainless steel surfaces can retain beads because of surface tension. Product inspection should distinguish normal droplets from repeatable pooling in a low area.
Do X-Shaped Drain Grooves Guarantee Better Drainage?
No.
Pressed lines or X-shaped grooves can help show the intended direction of flow and may add visual structure to the bowl floor. They do not correct:
- Poor overall slope
- Weld distortion
- A raised drain flange
- A sink installed out of level
- Low spots between the grooves
Grooves are a design feature, not proof of drainage performance.
For B2B approval, test the production-representative sink rather than approving drainage from the appearance of the grooves.
Handmade vs Pressed Sinks: Why Construction Matters
Handmade Stainless Steel Sinks
Handmade bowls are cut, bent and welded. Floor slope may be created through panel geometry and fabrication. Welding, grinding and stress can affect local flatness if the process is not controlled.
Rear-drain handmade sinks need consistent directional geometry across a relatively broad floor area.
Pressed or Drawn Stainless Steel Sinks
Pressed sinks form the bowl and drain region through tooling. The floor profile can be highly repeatable when tooling and forming are controlled, but tool wear, material behavior and springback still require inspection.
Granite Composite Sinks
Composite bowls receive their drain location and slope from the mold. Drain geometry should be checked for molding consistency, flange fit and cabinet clearance.
Construction method does not make one drain position automatically superior. It changes how the geometry is produced and controlled.
Does a Rear Drain Really Create More Cabinet Space?
It can—but only if the complete waste system also moves out of the way.
A rear drain may move the strainer, disposal and trap toward the back of the cabinet. This can preserve a larger usable area at the front for:
- Pull-out trash and recycling bins
- Cleaning-product drawers
- Water-filtration equipment
- Storage organizers
- Leak-detection trays
- Open knee space
However, a rear drain does not make the plumbing disappear.
Storage may still be lost when:
- The disposal is too large for the space behind it.
- The trap must return toward the middle of the cabinet.
- The wall drain is positioned on the opposite side.
- Supply valves and faucet hoses occupy the same rear zone.
- A cabinet rail, shelf or drawer conflicts with the pipe.
- The sink is so deep that the trap cannot connect conveniently.
The honest claim is “rear drains may improve usable cabinet space,” not “rear drains always provide more storage.”
Center Drain and Cabinet Organization
A center drain usually places the strainer, trap and disposal near the middle of the cabinet.
This has two opposing effects:
Advantage
The plumbing may have more clearance from both sidewalls and the rear wall. Installation and future service can be easier.
Disadvantage
The waste system divides the cabinet’s most accessible storage area. Full-width drawers and pull-out bins become harder to plan.
A center drain is still a sensible choice when the cabinet is primarily a service space or its organizer is designed around central plumbing.
Garbage Disposal Compatibility: Drain Position Is Only the First Check
A garbage disposal hangs below the drain and has its own height, body diameter and discharge position.
Rear Drain Advantages
- Can keep the disposal away from the cabinet center
- May preserve front storage space
- May leave one side free in a rear-offset layout
Rear Drain Risks
- Disposal body contacts the cabinet back
- Discharge outlet is too close to the wall
- Plumbing cannot turn without interfering with a rail or drawer
- Faucet hoses or valves conflict with the disposal
- Deep sink places the discharge too low relative to the wall drain
Center Drain Advantages
- Often provides open space around the disposal body
- Familiar position for replacement work
- Can simplify a centered existing rough-in
Center Drain Risks
- Occupies central cabinet volume
- Blocks full-width storage
- May conflict with under-sink drawers
Before approval, verify:
- Drain-hole and mounting-flange compatibility
- Disposal body diameter
- Total installed height
- Discharge-outlet center height
- Rear- and side-wall clearance
- Wall-drain height and horizontal location
- P-trap route
- Dishwasher hose connection
- Electrical connection
- Access for removal and maintenance
A matching drain-hole diameter does not prove that the disposal installation will fit.
The Critical Vertical Relationship Most Buyers Miss
Water leaving a sink or disposal must reach the trap and downstream piping through an appropriate gravity-drainage arrangement.
Before changing to a deeper or rear-drain sink, compare four elevations:
- Bottom of the sink outlet
- Disposal discharge centerline, when used
- P-trap connection zone
- Wall-drain centerline
If the sink or disposal outlet is too low relative to the existing wall connection, the new installation may require plumbing modification. Adding random fittings cannot create missing vertical space.
This is why “the countertop cutout fits” does not mean “the replacement sink fits.”
Horizontal drainage piping also requires suitable uniform slope and approved fittings under the applicable plumbing rules. The current International Plumbing Code describes uniform alignment and slope requirements for horizontal drainage piping. Review the ICC sanitary-drainage guidance.
The exact installation should be confirmed by the responsible plumbing professional and local authority.
Why Deep Sinks Require Extra Planning
A deeper bowl consumes more cabinet height before the drain assembly is added.
The complete vertical stack may include:
- Sink depth below the countertop
- Drain flange or strainer body
- Garbage disposal, if used
- Discharge connection
- P-trap
- Required pipe route
A 10-inch rear-drain sink is not automatically more space-efficient than an 8-inch center-drain sink. It may improve horizontal storage while creating a vertical connection problem.
Matrix reviews bowl depth, drain position and cabinet clearance together when developing deep kitchen sink programs.
Daily Workflow: Where the Difference Becomes Noticeable
Large Pots and Baking Sheets
A rear drain leaves more uninterrupted space toward the front and center. Large cookware is less likely to sit directly over the outlet.
A center drain may be covered by a pan or stack of dishes, temporarily slowing visible water movement.
Food Preparation
In a workstation sink, users often work near the front or across accessory ledges. A rear or offset drain can keep the outlet away from the primary working zone.
Rinsing the Bowl
A center drain can be rinsed inward from all directions and is easy to reach.
A rear drain may require a longer rinse path from the front of a large bowl. Faucet reach and spray coverage therefore matter.
Retrieving the Strainer
A center strainer is usually easier to reach. A rear strainer can be less comfortable in a deep bowl for shorter users or users with limited reach.
Soaking
Drain location has little effect when the bowl is stopped and intentionally filled. Stopper quality and bowl capacity matter more.
Cleaning: Rear Drain vs Center Drain
| Cleaning factor | Rear drain | Center drain |
| Access to strainer | Farther reach | Usually easier |
| Open work surface | More open at front/center | Drain occupies center |
| Food movement | Longer path from front | Shorter average path |
| Hidden residue | Can collect near rear corners | Can collect under cookware covering drain |
| Rinsing pattern | Directional toward rear | Inward from several sides |
Neither design is self-cleaning. Bowl radius, finish, faucet coverage and user habits may affect cleaning more than the drain coordinate.
Does Drain Position Affect Clogging?
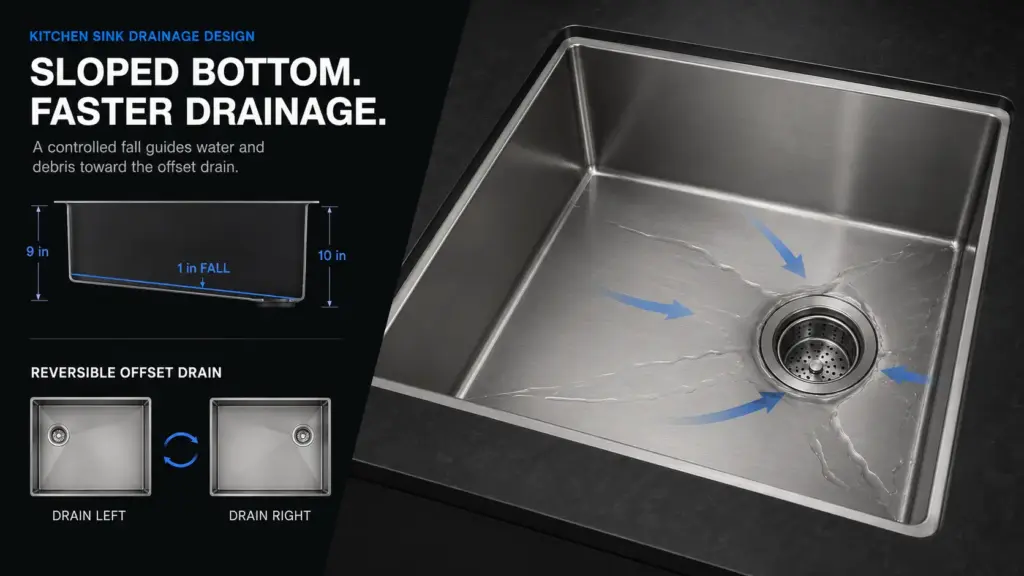
Not directly enough to claim that one layout prevents clogs.
Clogging is more strongly related to:
- Food and grease entering the waste system
- Strainer effectiveness
- Disposal operation and maintenance
- Trap and pipe condition
- Pipe slope and venting
- Excessive or unsuitable changes in direction
- Existing buildup
A rear drain can remain uncovered while dishes occupy the front of the bowl. A center drain may be easier to access and clear. Neither advantage eliminates poor waste practices or plumbing defects.
Which Position Is Better for a Workstation Sink?
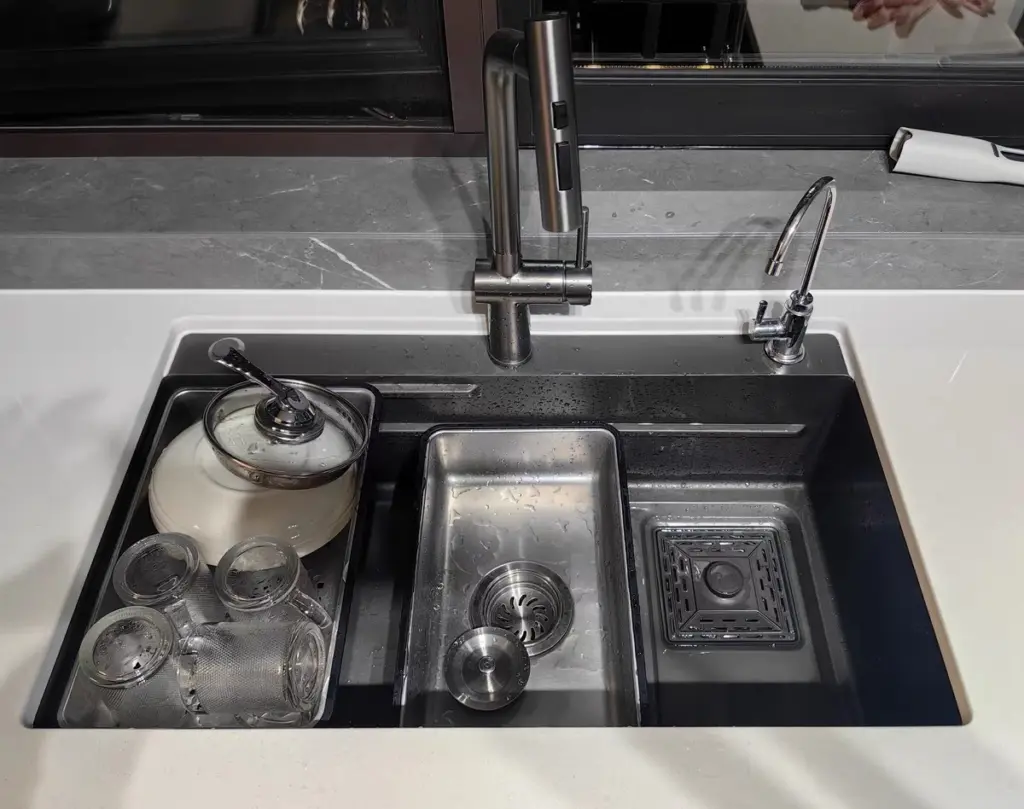
A rear or rear-offset drain is often useful in a large workstation sink because:
- Cutting boards and trays can occupy the main working area without covering the outlet.
- The center of the bowl remains more open for cookware.
- Plumbing can be coordinated with cabinet storage.
But the complete accessory system must match the drain position.
Check:
- Bottom-grid opening
- Colander and basket location
- Cutting-board coverage
- Roll-up rack position
- Faucet spray reach
- Disposal access
- Drain visibility during use
The drain should not be selected independently from the workstation accessories.
Bottom Grids Must Match the Exact Drain Location
A grid for a center-drain sink is not compatible with a rear-drain bowl simply because its overall dimensions are similar.
Confirm:
- Drain opening X/Y coordinates
- Opening diameter and shape
- Grid orientation
- Bowl radius
- Feet and bumper positions
- Access to the strainer or disposal splash guard
Matrix supplies sink bottom grids for center, rear and offset drain layouts.
Rear Drain and Accessible Kitchen Planning
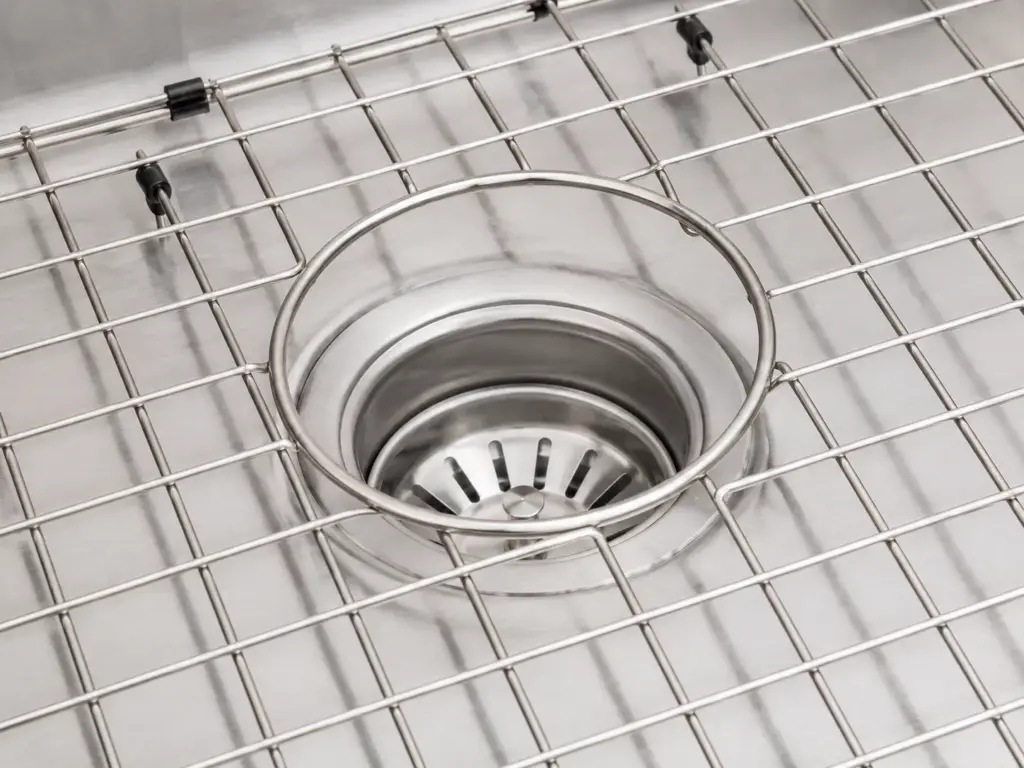
A rear drain may help move the P-trap and garbage disposal away from the front knee-space area. The U.S. Access Board specifically discusses using a rear drain to reduce garbage-disposal interference below an accessible sink. See the U.S. Access Board sink guidance.
However, drain position alone does not make a sink or kitchen accessible.
The final installation may also depend on:
- Counter height
- Bowl depth
- Knee and toe clearance
- Clear floor space
- Faucet reach and operation
- Pipe insulation or protection
- Cabinet construction
- Project and local requirements
Use the final installed drawing for accessibility review.
Rear Drain vs Center Drain for Double-Bowl Sinks
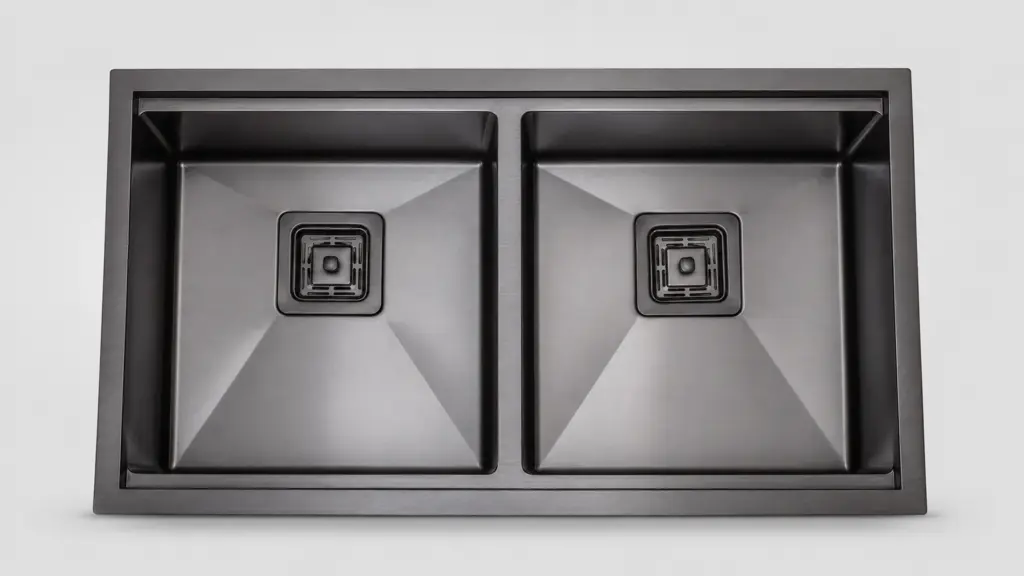
In a double-bowl sink, both outlets and the complete waste kit must be planned together.
Possible arrangements include:
- Two center drains
- Two rear-center drains
- Two rear-offset drains
- Mirrored drains
- Disposal under one bowl and strainer under the other
Review:
- Distance between drain centers
- Bowl depths
- Disposal location
- Continuous-waste connection
- Trap position
- Dishwasher connection
- Cabinet storage
- Bottom-grid openings
- Service access
An attractive symmetrical drain layout may create unnecessary pipework. An asymmetrical layout may improve cabinet use but complicate SKU and accessory control.
For B2B programs, approve the installed waste arrangement—not only the sink drawing.
Can You Rotate the Sink to Move the Drain?
Do not rotate a sink unless its drawing and instructions allow it.
Rotation may change:
- Front and rear bowl slope
- Faucet deck position
- Faucet-hole layout
- Workstation ledges
- Drainboard orientation
- Logo direction
- Brushed-finish direction
- Mounting hardware
- Sound pads and undercoating
- Countertop cutout
A reversible-looking sink is not necessarily a reversible product.
Replacement Project: Measure Before Changing Drain Position
Sink and Countertop
- Existing sink outside dimensions
- Countertop cutout
- Installation type
- Bowl depth below mounting plane
- Faucet and backsplash clearance
Cabinet
- Internal width, depth and height
- Structural rails and drawer positions
- Storage or pull-out equipment
- Water filter, heater and leak tray
Plumbing
- Wall-drain center height
- Wall-drain horizontal position
- Supply-valve positions
- Existing trap route
- Dishwasher hose
- Venting arrangement where relevant
Garbage Disposal
- Body diameter
- Installed height
- Discharge center height
- Electrical location
- Required service clearance
New Sink
- Drain X/Y coordinates
- Drain-hole and recess dimensions
- Bowl depth
- Bottom-grid opening
- Intended viewing direction
Provide these measurements to the installer before purchase. Field modification after countertop installation is more expensive and less predictable than pre-installation planning.
A Simple Five-Step Selection Method
Step 1: Decide Whether This Is New Construction or Replacement
New construction offers freedom to coordinate the rough-in. Replacement work should begin with the existing pipe and cabinet positions.
Step 2: Define Cabinet Use
Decide whether the cabinet must hold bins, drawers, filtration equipment or only plumbing.
Step 3: Model the Disposal and Trap
Use actual dimensions. Do not draw the disposal as a small circle or assume the trap sits directly below the outlet.
Step 4: Confirm Bowl Performance
Review bowl slope, drain recess, installation level and a representative drainage test.
Step 5: Match Accessories and Approve the Complete System
Confirm the strainer, disposal, grid, waste kit, packaging and SKU mapping before ordering.
Decision Guide by Kitchen Type
| Kitchen or project | Recommended starting point | Why |
| Planned kitchen with pull-out waste bins | Rear or rear-offset | Preserves front or side cabinet volume |
| Existing center-drain replacement | Center drain | Usually minimizes plumbing changes |
| Large single-bowl sink | Rear or offset | Keeps cookware away from the drain |
| Compact bar or prep sink | Center drain | Simple, accessible layout |
| Deep sink with disposal | Measure before choosing | Vertical clearance becomes critical |
| Open-base accessible sink | Rear drain may help | Can move plumbing away from knee space |
| Workstation sink | Rear or offset often preferred | Keeps primary working area open |
| Under-sink drawer system | Rear or custom offset | Waste system can be coordinated behind drawers |
| Rental renovation | Match project rough-in | Repeatable installation reduces field changes |
| Double-bowl sink | Project-specific | Both drains and the full waste kit must be modeled |
B2B Buyers: “Rear Drain” Is Not a Production Specification
A professional drawing should define:
- Drain center X-coordinate
- Drain center Y-coordinate
- Dimension reference edges
- Viewing direction
- Drain-hole diameter and tolerance
- Drain recess diameter and depth
- Bowl-bottom geometry
- Bowl depth from mounting plane
- Strainer and disposal assumptions
- Bottom-grid opening coordinates
- Cabinet and plumbing envelope
- Left/right model designation
- Drawing revision
Never rely on “rear left” or “rear right” without defining whether the sink is viewed from the front, rear or underside.
B2B Installed-Envelope Drawing
In addition to the sink drawing, create a cabinet installation drawing with:
Front View
- Sink and cabinet centerlines
- Drain X-position
- Disposal body
- Valves and filter equipment
- Drawers or bins
Side View
- Countertop and mounting plane
- Bowl depth
- Drain or disposal projection
- Discharge centerline
- P-trap zone
- Wall-drain centerline
- Rear-wall clearance
Top View
- Bowl and outlet position
- Cabinet sidewalls
- Disposal diameter
- Faucet hoses
- Storage envelope
This three-view check finds conflicts that a sink-only drawing cannot show.
B2B Approval Checklist
| Area | Approval question |
| Market | Is this drain layout suitable for local replacement and plumbing habits? |
| Coordinates | Are X/Y position, reference edges and viewing direction clear? |
| Bowl floor | Does the geometry direct water toward the outlet? |
| Drain recess | Does the intended flange sit correctly? |
| Cabinet | Does the installed system preserve the promised usable space? |
| Disposal | Are body, height, discharge and service clearances verified? |
| Rough-in | Can the trap and waste pipe connect correctly? |
| Workstation | Do accessories leave the outlet usable? |
| Bottom grid | Does its opening align with the sink? |
| Double bowl | Are both drains and waste connections modeled? |
| Accessibility | Has the complete installed space been reviewed where applicable? |
| Service | Can the trap, disposal and valves be reached and removed? |
| Repeat order | Are drawings, labels and accessories revision-controlled by SKU? |
A Better Drainage-Test Method
“Water drains well” is not a repeatable quality requirement.
A useful internal test should define:
- Sink model and drawing revision
- Level support fixture
- Drain flange or strainer used
- Outlet open or controlled test condition
- Water introduction method and volume
- Drain time before inspection
- Difference between droplets, film and a defined puddle
- Inspection lighting and camera position
- Repeat-test requirement
- Acceptance criteria agreed with the buyer
During evaluation:
- Confirm the test sink is level before adding water.
- Wet the intended bowl area consistently.
- Allow water to discharge without manually pushing it toward the drain.
- Inspect repeatable low areas rather than isolated droplets.
- Repeat the test to distinguish a real geometry issue from random surface behavior.
Do not invent a universal residual-water limit for every sink size, finish and market. Define it in the product program.
Drain-Position Quality Inspection Checklist
Inspect:
- Drain X/Y coordinates
- Hole diameter and tolerance
- Hole-edge quality
- Recess concentricity and depth
- Bowl-floor geometry
- Local flatness around the drain
- Sink level during drainage test
- Strainer or disposal-flange seating
- Leak performance
- Bottom-grid alignment
- Left/right SKU marking
- Accessory packing
- Cabinet/disposal fit where agreed
- Repeat-order drawing revision
Common Complaints and Root Causes
| Complaint | Likely root cause |
| Water stays at the front of a rear-drain sink | Inadequate directional slope, low spot, high flange or installation out of level |
| Rear drain did not create storage space | Trap or rough-in remained in the middle; cabinet system was not modeled |
| Disposal hits the back wall | Drain coordinate approved without the disposal envelope |
| New sink cannot connect to the wall drain | Bowl depth, discharge height or rough-in elevation was not checked |
| Sink drains slowly | Strainer, blockage, disposal, trap, vent or downstream pipe issue |
| Grid opening is in the wrong place | Sink and grid used different coordinates or revisions |
| Drain arrived on the wrong side | Viewing direction or model label was unclear |
| Water remains around the flange | Drain recess or flange sits too high |
| Double-bowl pipework is crowded | Both bowls were not modeled as one waste system |
Root-cause analysis should separate bowl geometry, drain hardware, installation and plumbing. Replacing the sink does not solve every drainage complaint.
Claims to Avoid
- “Rear drains always drain faster.”
- “Center drains always clog.”
- “An X-shaped floor guarantees complete drainage.”
- “A rear drain automatically creates more storage.”
- “Any garbage disposal fits a standard drain hole.”
- “If the countertop cutout fits, the replacement will fit.”
- “A rear drain alone makes the sink accessible.”
- “The same bottom grid fits center and rear drains.”
- “No visible water droplets means perfect drainage.”
- “A product photo is enough to approve drain position.”
Precise, conditional claims are more useful to buyers and safer for after-sales communication.
Frequently Asked Questions
Is a rear drain better than a center drain?
A rear drain is usually better for cabinet organization and keeping the main bowl area open. A center drain is often better for simple replacement and easy strainer access.
Which drain position drains faster?
Neither position is inherently faster. Bowl slope, flatness, flange geometry, sink level and plumbing determine actual performance.
Does a rear drain create more storage?
It may preserve front or side cabinet space when the trap, disposal and rough-in are also coordinated toward the rear.
Is a rear drain harder to clean?
It can require a longer reach in a large, deep sink. However, it leaves the center work area more open and may remain uncovered by dishes.
Does a center drain clog more often?
Not inherently. Clogs are more closely related to what enters the drain and the condition of the strainer, disposal, trap, vent and waste piping.
Can I install a garbage disposal on a rear drain?
Yes, when the flange, disposal body, rear-wall clearance, discharge height, trap and electrical connection are compatible.
Can I replace a center-drain sink with a rear-drain sink?
Often yes, but first check bowl depth, countertop cutout, wall-drain height, horizontal pipe location, disposal clearance and cabinet equipment.
Does a rear drain prevent standing water?
No. Standing water depends mainly on bowl geometry, flange height and installation level.
Are water droplets after draining a quality defect?
Not automatically. Surface tension can leave droplets or a thin film. A repeatable puddle in a defined low area deserves investigation.
Do X-shaped grooves make water drain better?
They may indicate intended flow direction, but they cannot correct inadequate slope, distortion, a high flange or an out-of-level installation.
Which drain is best for a large single bowl?
A rear or rear-offset drain is often useful because large cookware is less likely to cover it. Plumbing clearance still needs verification.
Which drain is best for a workstation sink?
Rear or offset drains often keep the main working zone open, but cutting boards, grids, colanders and disposal access must be reviewed together.
Is a rear-center drain the same as a rear-offset drain?
No. A rear-center drain remains centered left to right. A rear-offset drain also moves toward one side.
Can I rotate a rear-drain sink?
Only if the product drawing permits it. Rotation may affect slope, faucet holes, ledges, finish direction, soundproofing and cutout requirements.
Is a rear drain better for an accessible kitchen?
It can help move plumbing away from front knee space, but the complete sink, counter, faucet, pipe protection and installed clearances determine accessibility.
Final Answer
Choose a rear drain when you prioritize:
- Front cabinet storage
- Pull-out bins or drawers
- An open main bowl area
- Workstation-sink workflow
- Rearward plumbing in an accessible layout
Choose a center drain when you prioritize:
- Simple replacement
- Easy strainer access
- Symmetrical bowl design
- Compatibility with an existing centered rough-in
- More space around a large disposal body
The most important conclusion is:
Drain position affects workflow and installation layout. Bowl geometry and plumbing determine drainage performance.
Before ordering, confirm:
- Sink depth and floor geometry
- Drain X/Y position
- Cabinet dimensions
- Wall-drain elevation and location
- Disposal body and discharge height
- P-trap and pipe route
- Bottom-grid opening
- Storage, service or accessibility requirement
For B2B projects, approve the sink, drain fittings, disposal assumptions, cabinet envelope and accessories as one installed system. “Rear,” “center” and “offset” are category names—not complete specifications.
Develop Center-, Rear- and Offset-Drain Sinks with Matrix
Matrix supports kitchen sink programs for brands, importers, wholesalers, distributors and project buyers.
Options and development support can include:
- Handmade and pressed stainless steel sinks
- Granite composite sink options
- Single- and double-bowl layouts
- Center, rear and offset drain positions
- Drain-coordinate and bowl-drawing review
- Deep-sink and cabinet-clearance planning
- Strainer and garbage-disposal compatibility review
- Bottom-grid and workstation-accessory matching
- OEM/private-label packaging
- Sample approval and batch inspection
- Repeat-order drawing and SKU control
Review the Matrix kitchen sink installation guides when planning dimensions, drain position and accessories.
To discuss a sample, custom drain layout or OEM sink program, contact Matrix.