A kitchen faucet splashes when the water hits the wrong part of the sink, falls too far, exits in an unstable stream or strikes a surface that redirects it outside the bowl.
The faucet is not always defective, and the sink is not always too shallow. In many cases, two individually acceptable products simply do not work well together.
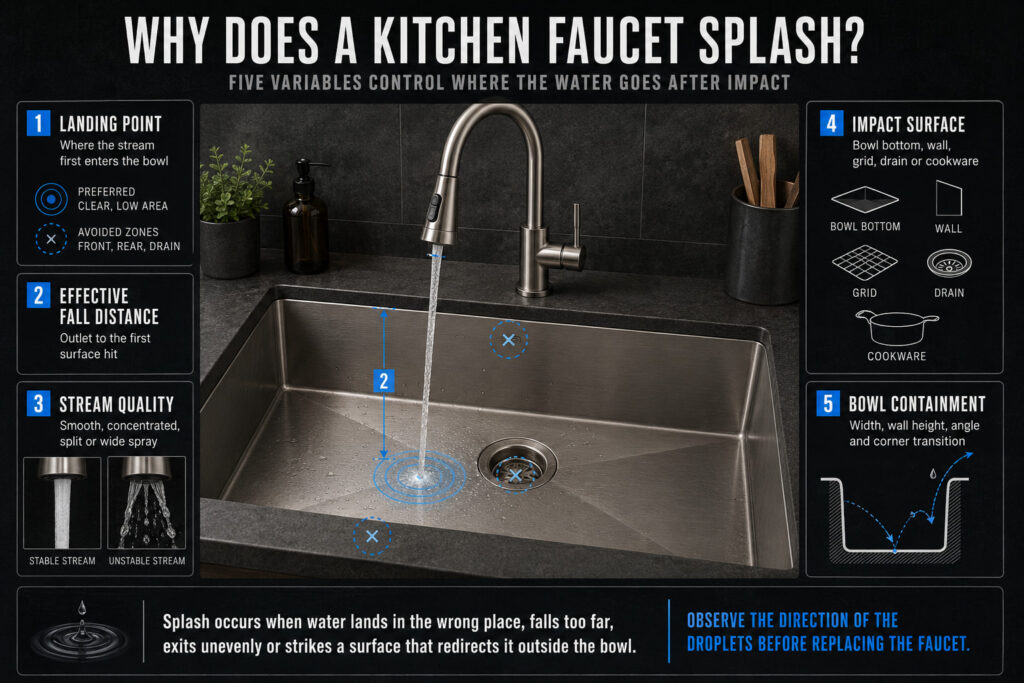
Kitchen faucet splashing is controlled by five variables:
- Landing point: where the water enters the bowl
- Fall distance: how far it travels before impact
- Stream quality: whether the water is smooth, concentrated or irregular
- Impact surface: what the water hits first
- Bowl containment: how effectively the sink walls contain the rebound
Understanding these five variables makes the problem much easier to diagnose.
Quick diagnosis: Where is the water coming from?
Do not replace the faucet immediately. First, observe the splash pattern.
| What you observe | Most likely cause |
|---|---|
| Water hits the rear wall of the bowl | Spout reach is too short |
| Water lands near the front wall | Spout reach is too long or the faucet hole is too far forward |
| Water rebounds vertically from the bottom | Long fall distance, high flow or a hard, flat impact area |
| Water sprays sideways directly from the outlet | Dirty, damaged or incorrectly assembled aerator |
| Splashing happens only at full flow | Excessive flow velocity or an unsuitable stream pattern |
| Splashing happens only in spray mode | Spray head is too high or spray pattern is too wide |
| Splashing happens only with a bottom grid installed | Water is hitting a grid wire |
| Splashing happens only while washing dishes | Water is striking cookware, utensils or a plate edge |
| The stream lands off-center | Faucet body or spray head is misaligned |
| The faucet moves while being used | Loose mounting, oversized hole or insufficient deck support |
The location and direction of the droplets usually reveal more than the amount of water on the countertop.
1. The faucet spout reach is wrong for the sink
Spout reach is the horizontal distance from the faucet’s mounting centerline to the center of the water outlet.
It determines how far the stream enters the bowl.
When the spout reach is too short
A short spout may direct water onto:
- The rear bowl wall
- The rear slope
- The edge of the drain
- The narrow area between the drain and rear wall
The water then changes direction and rebounds toward the faucet base, backsplash and countertop.
A short reach can also make users work too close to the back of the sink, increasing splash during handwashing and dishwashing.
When the spout reach is too long
An excessively long reach may direct water toward:
- The front half of the bowl
- The front wall
- The user
- The exposed apron of a farmhouse sink
This is especially problematic in compact or shallow sinks.
Where should the water land?
A practical landing zone is usually:
- Clearly inside the bowl
- Away from the front and rear walls
- Close to the lower drainage area
- Free from raised drain components
- Clear of bottom-grid wires
- Large enough for normal handwashing and cookware
The stream does not have to hit the exact center of the drain. In fact, directly hitting a raised basket strainer, disposal flange or drain cover can increase splash.
The best landing point is a clear area where the water can spread, lose energy and flow toward the drain without being sharply redirected.
Before selecting a faucet, review the kitchen sink faucet hole size, spacing and compatibility.
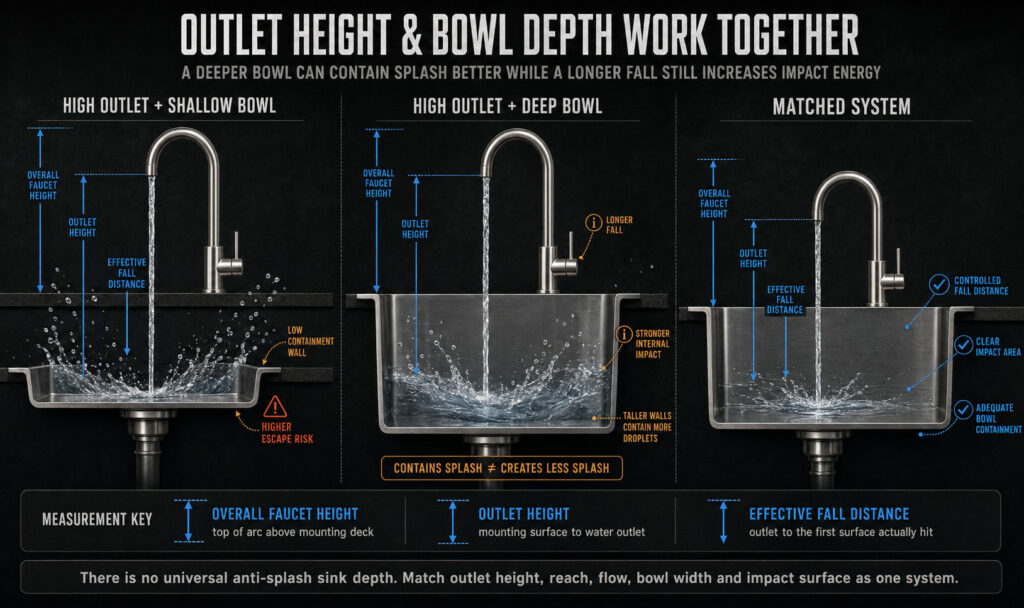
2. The outlet is too high above the impact surface
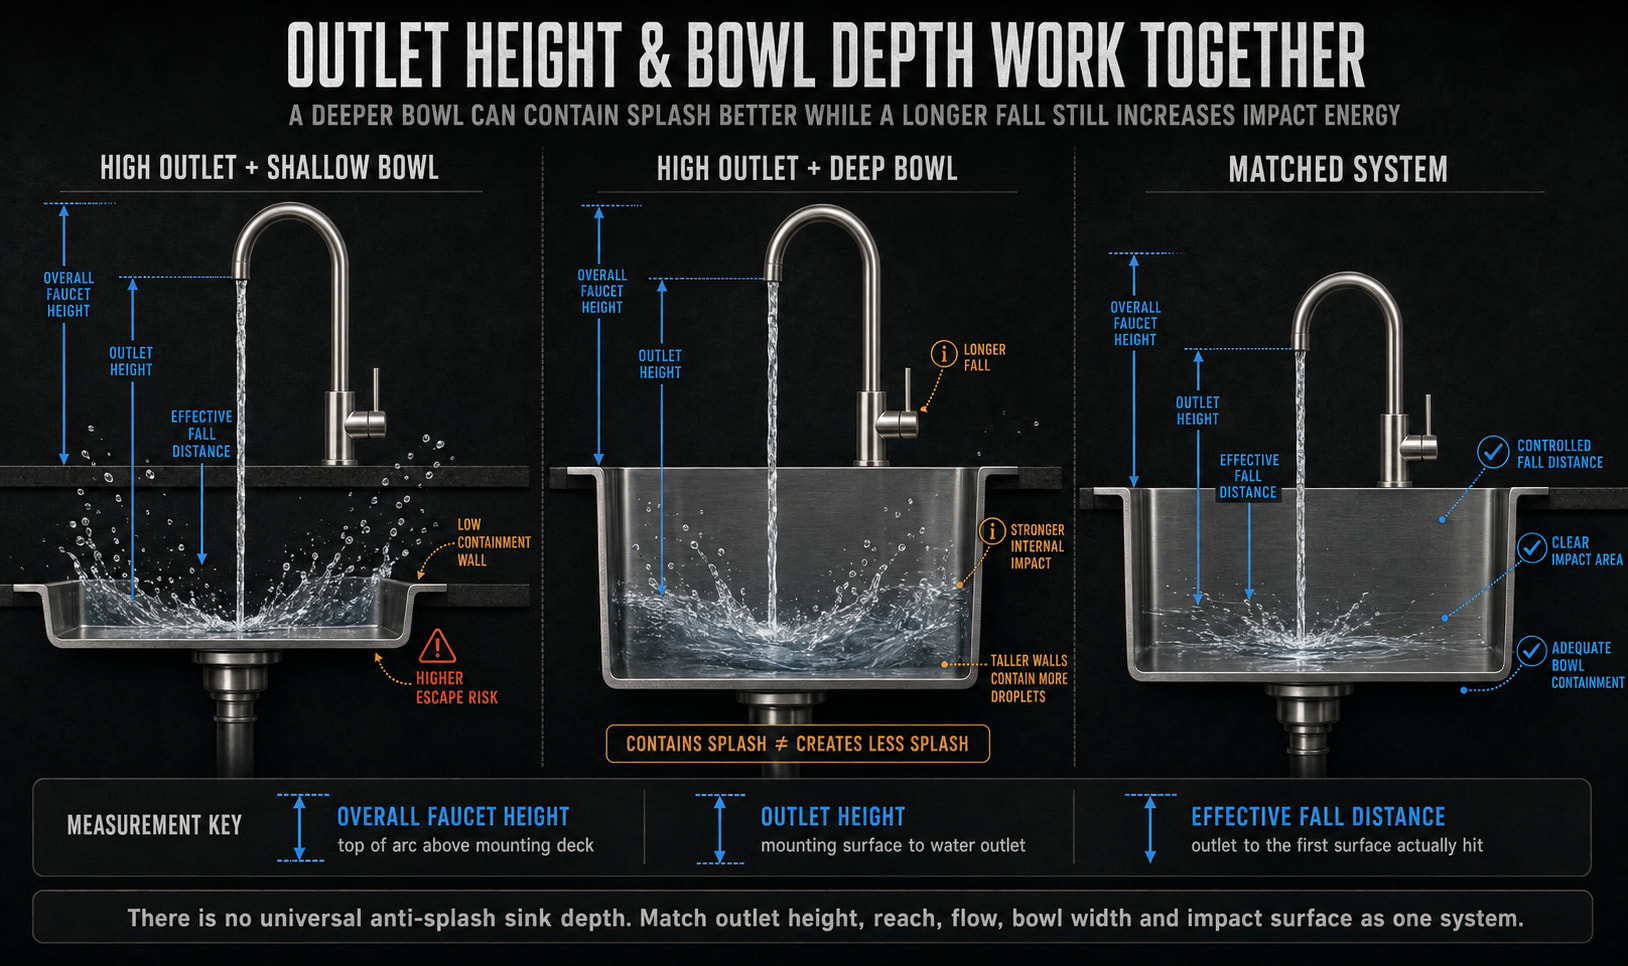
A high-arc faucet provides useful clearance for stockpots, trays and tall containers. However, it also increases the distance between the outlet and the surface below.
As the water falls, it gains speed before striking the sink.
The most useful measurement is therefore not only the published overall faucet height. It is the actual distance from the water outlet to the first surface the stream hits.
This is the effective fall distance.
A tall faucet is more likely to splash when combined with:
- A shallow bowl
- A narrow sink
- A flat bowl bottom
- A concentrated stream
- A raised drain cover
- A faucet hole positioned far behind the bowl
- High water flow
This does not mean high-arc faucets should be avoided. They work well when the bowl provides enough width, depth and clear landing space.
For larger bowls and sinks used with tall cookware, a properly matched pull-down kitchen faucet can provide both clearance and better control.
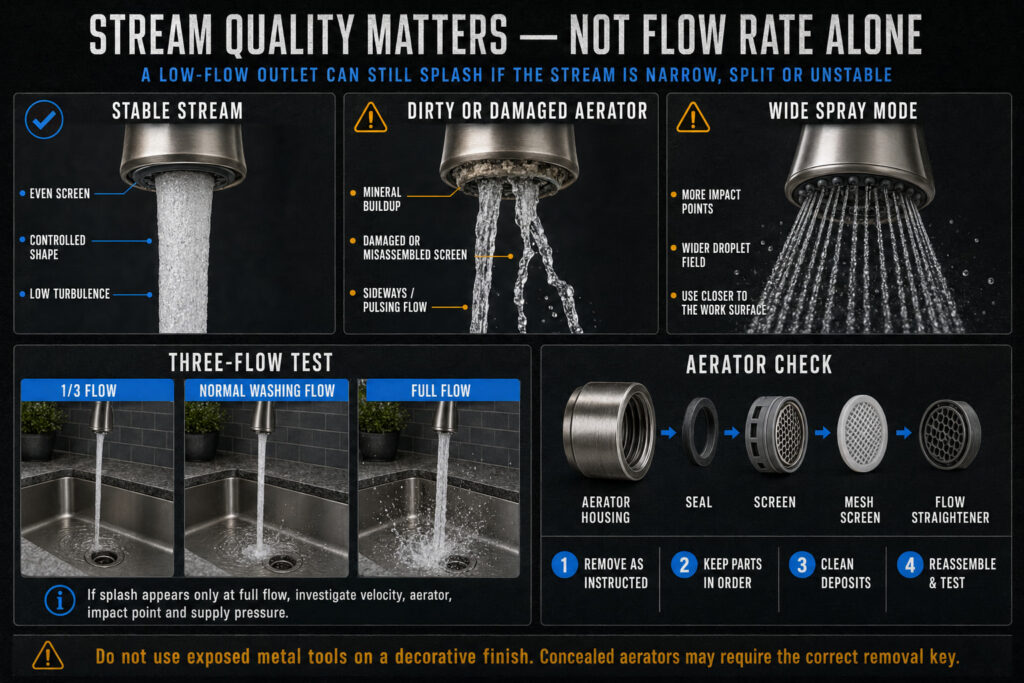
3. Water pressure, flow rate and exit velocity are being confused
“Too much water pressure” is a common explanation for faucet splashing, but pressure is only part of the problem.
These terms are related but not identical:
- Water pressure is the force available in the supply system.
- Flow rate is the volume of water delivered over time.
- Exit velocity is the speed of the water as it leaves the faucet.
- Stream pattern describes the shape and distribution of that water.
Splashing at the sink is strongly affected by exit velocity, fall distance, impact angle and stream pattern.
A narrow jet may hit the sink forcefully even when the total flow rate appears moderate. A wide spray may have a reasonable flow rate but create many more airborne droplets.
Simple flow test
Open the faucet in three stages:
- Approximately one-third flow
- Normal washing flow
- Full flow
If splash becomes severe only at full flow, the likely causes are:
- Excessive flow for the bowl geometry
- A concentrated stream
- An unsuitable aerator
- A hard impact point
- Excessive household water pressure
Possible corrections include installing the appropriate flow-control component, checking the aerator and confirming that the faucet is operating within its intended pressure range.
Partially closing the shutoff valve may reduce flow temporarily, but it is not an ideal long-term substitute for correct flow control or proper product matching.
If pressure appears unusually high throughout the property, have the system evaluated by a qualified professional.
4. The aerator is producing an unstable stream
The aerator is the small component at the faucet outlet that controls the shape and behavior of the water stream.
Depending on its design, it may:
- Mix air into the water
- Straighten the stream
- Control the flow rate
- Reduce turbulence
- Limit side spray
Mineral deposits, sediment, damaged screens or incorrectly assembled parts can cause the stream to become:
- Uneven
- Split
- Sideways
- Narrow and aggressive
- Noisy
- Pulsing
- Turbulent
If the faucet worked normally before and has recently started splashing, the aerator should be one of the first components checked.
How to inspect the aerator
- Turn off the faucet.
- Remove the aerator according to the product instructions.
- Note the order and orientation of the internal parts.
- Check for sediment, mineral deposits or damaged screens.
- Clean the components using a method suitable for their materials.
- Flush the faucet briefly without the aerator.
- Reassemble and test at normal flow.
Avoid using exposed metal tools directly against a decorative faucet finish. Some concealed aerators require a dedicated removal key.
A low-flow aerator is not automatically splash-free
Reducing the total flow can help, but stream quality still matters.
If the aerator produces a thin, fast jet, it may continue to splash when it hits the drain, grid or bowl bottom. A stable and well-shaped stream can perform better than a lower-volume but poorly controlled jet.
5. Sink depth is helping—and hurting
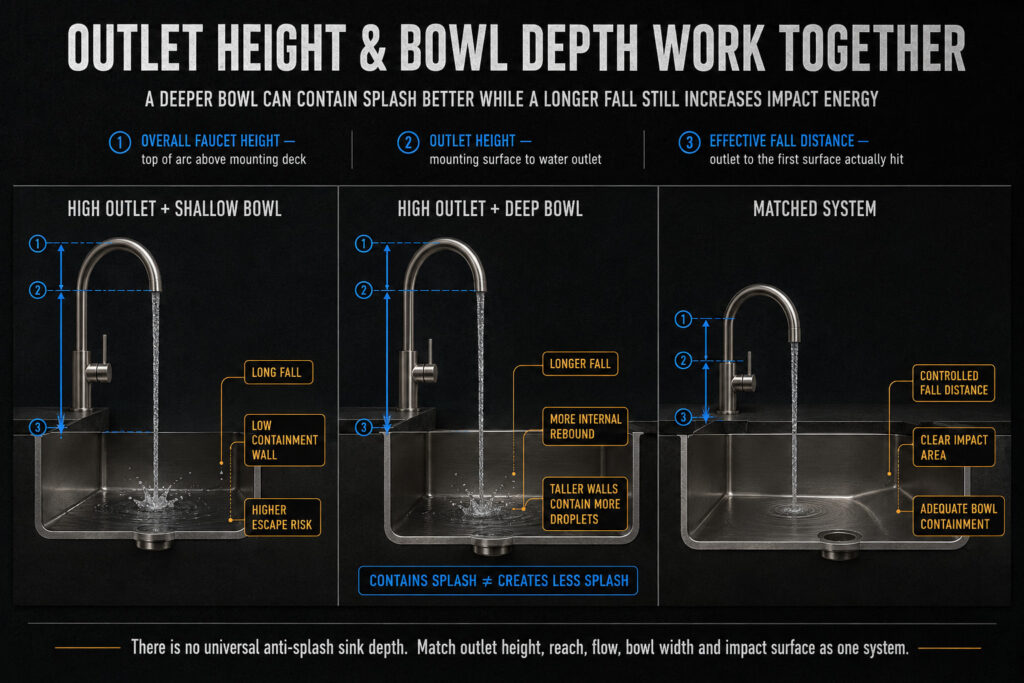
A deeper sink has taller walls that help contain water. For this reason, deep bowls often reduce the amount of water that escapes onto the countertop.
However, a deeper bowl also increases the distance between the faucet outlet and the bowl bottom.
These effects work against each other:
- Taller walls improve containment.
- A longer fall can increase impact energy.
This leads to an important conclusion:
A deeper kitchen sink may contain splash better without actually producing less splash inside the bowl.
If water still reaches the user or countertop, the real issue may be the spout reach, stream velocity or impact surface—not simply the bowl depth.
An 8-, 9- or 10-inch sink can all perform well when properly matched. There is no universal anti-splash depth.
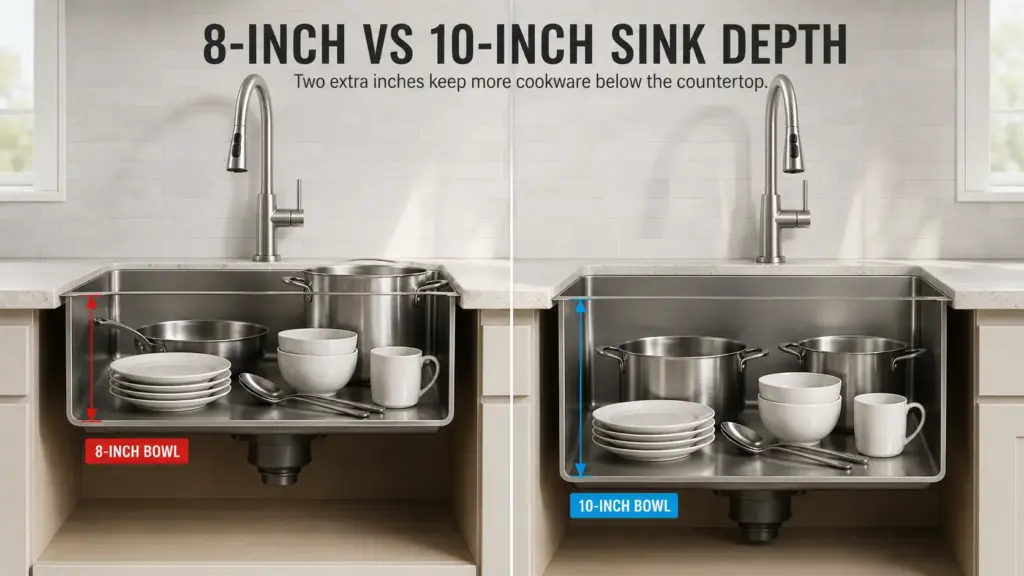
When comparing deep kitchen sinks, also consider:
- Internal bowl width
- Faucet outlet height
- Spout reach
- Drain position
- Bottom slope
- Cabinet clearance
- Garbage disposal position
- User working height
Choosing the deepest available sink without checking these factors can create new ergonomic and plumbing problems.
6. The bowl geometry creates a hard rebound
Two sinks with the same external dimensions and depth can behave differently under the same faucet.
Splash performance is affected by:
- Bottom flatness
- Drain position
- Bowl-wall angle
- Corner radius
- Transition between the wall and bottom
- Distance between the landing point and drain
- Height of the drain assembly
A stream landing on a broad, flat area may spread rapidly in several directions.
A stream landing on a steep wall can be redirected upward or outward.
A stream landing near a properly sloped drainage area may lose energy and flow toward the drain more smoothly.
This does not mean one bowl shape is always superior. The result depends on where the faucet directs the water.
The drain is not always the safest target
Positioning the stream directly over the drain may appear ideal. However, several components can create a raised impact point:
- Basket strainer
- Disposal flange
- Rubber splash guard
- Drain cover
- Decorative drain cap
- Food catcher
If water strikes the edge or center of one of these components, it may rebound vertically.
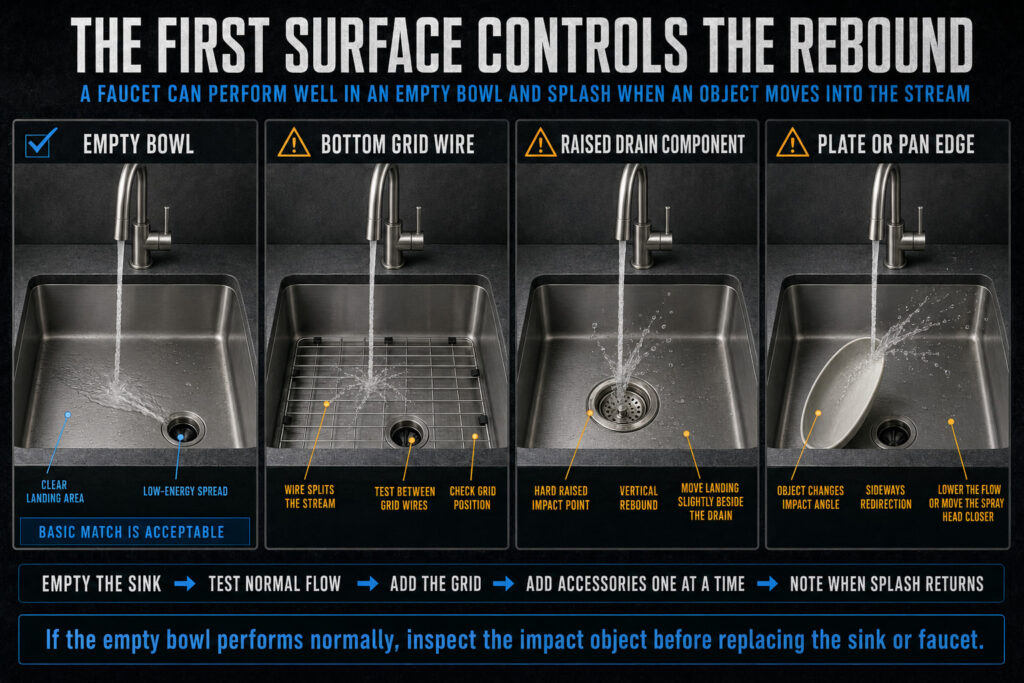
Moving the landing point slightly away from the drain can sometimes reduce splash without changing the faucet or sink.
7. The water is hitting a grid, accessory or piece of cookware
Splash may not come from the bare sink at all.
Common impact objects include:
- Bottom grids
- Plates
- Spoons
- Knives
- Pan edges
- Colanders
- Roll-up racks
- Drain covers
- Cutting boards
A horizontal bottom-grid wire can divide a stable stream into several smaller streams. A spoon can redirect water sideways. A plate held vertically can send water toward the user.
Empty-bowl test
Remove the dishes, bottom grid and loose accessories. Run the faucet into the empty sink at normal flow.
If the splash disappears, the basic sink-and-faucet match is probably acceptable. The problem is the impact point created by an object inside the bowl.
Reinstall each component separately until the splash returns.
For a workstation kitchen sink, test the faucet with every supplied accessory. The sink may perform well when empty but behave differently with a colander, roll-up rack or cutting board in position.
8. The spray head or faucet body is misaligned
A correctly specified faucet can still splash if it is not installed or docked correctly.
Possible causes include:
- Faucet body rotated during installation
- Loose mounting nut
- Oversized faucet hole
- Insufficient deck support
- Pull-down head not fully docked
- Twisted hose below the sink
- Magnetic or mechanical docking misalignment
- Spray nozzles pointing unevenly
- Flexible sink deck moving during operation
Observe whether the landing point changes when the handle is operated or the pull-down head is returned to the spout.
If the faucet base moves, inspect:
- Mounting-hole diameter
- Deck thickness
- Mounting hardware
- Reinforcement plate
- Nut tightness
- Clearance below the sink
A moving faucet can gradually lose alignment and direct the stream toward a bowl wall.
Why spray mode splashes more than stream mode
Spray mode divides the flow into multiple smaller streams over a wider area. It is useful for rinsing produce, cookware and sink walls, but it naturally creates more droplets.
Splashing becomes worse when spray mode is used:
- From the fully docked high position
- At maximum flow
- Over a shallow bowl
- Directly above the bottom grid
- Against the sidewall
- Over lightweight utensils
Pull the spray head closer to the item being rinsed. Reducing the distance limits the area over which droplets can spread.
Use stream mode for filling containers or running water into an empty bowl. Use spray mode closer to the working surface.
A five-minute kitchen faucet splash test
Follow this sequence before buying replacement products.
Step 1: Empty the sink
Remove dishes, grids and accessories.
If the empty bowl performs normally, the splash is being created by an impact object.
Step 2: Test three flow levels
Compare low, normal and full flow.
If only full flow causes a problem, investigate stream velocity, aerator design and supply pressure.
Step 3: Compare water modes
Test stream and spray modes separately.
If only one mode splashes, inspect its nozzle pattern and use it closer to the working surface.
Step 4: Move the landing point
Use the pull-down head or swivel spout to direct water into different clear areas.
If a small change solves the problem, the original landing point is unsuitable.
Step 5: Remove the bottom grid
If splash disappears, note which grid wire was below the stream.
The faucet, grid or drain position may need to be adjusted.
Step 6: Inspect the aerator
Look for an uneven, split or sideways stream.
Clean or replace the correct component where necessary.
Step 7: Check faucet movement
Hold the faucet base while operating the handle and spray head.
Movement may indicate a mounting or deck-support problem.
How to measure an existing sink and faucet
Record five measurements.
A. Faucet setback
Measure from the center of the faucet mounting hole to the inside rear wall of the bowl.
This shows how much of the faucet’s reach is used before the water even enters the bowl.
B. Spout reach
Measure horizontally from the faucet centerline to the center of the outlet.
Do not confuse this with the overall projection of the faucet body.
C. Outlet height
Measure vertically from the mounting surface to the water outlet.
This is more relevant to splash than the total height at the top of the faucet arch.
D. Effective fall distance
Measure from the water outlet to the surface the stream actually hits.
This may be the bowl bottom, drain cover, grid, dish or accessory.
E. Actual landing point
Run the faucet at normal flow and mark where the center of the stream hits the empty bowl.
Compare this point with the drain, walls, grid and intended working area.
Do not assume the published spout reach predicts the exact landing point. The outlet angle and aerator design can move the stream forward or backward.
When can the problem be fixed without replacement?
Adjustment or maintenance is usually worth trying when:
- Splashing started recently
- The stream exits sideways
- Only full flow causes the problem
- Only spray mode causes the problem
- Splash occurs only with a grid or dish present
- The spray head is not fully docked
- The faucet body has rotated
- The aerator contains mineral deposits
- The faucet mount is loose
Replacement or product rematching may be necessary when:
- The faucet has splashed since installation
- The fixed spout always hits the rear or front wall
- The outlet is excessively high for a shallow bowl
- The reach cannot place water in a clear landing zone
- Every usable flow setting produces unacceptable splash
- The faucet and bowl were selected independently and cannot be adjusted
- The sink geometry provides no suitable landing area
Replacing only the aerator will not correct fundamentally unsuitable spout reach or outlet height.
How to choose a less splash-prone sink and faucet combination
There is no universal “best” faucet height or spout reach. The correct dimensions depend on the sink.
Use these starting principles:
| Sink configuration | Faucet-matching priority |
| Compact or shallow sink | Controlled outlet height and accurate landing point |
| Wide single bowl | Adequate reach without directing water toward the front wall |
| Deep sink | Stable stream and clear landing area away from raised drain parts |
| Double-bowl sink | Swivel range and usable landing point in both bowls |
| Workstation sink | Clearance and splash testing with accessories installed |
| Farmhouse sink | Reach that prevents water from rebounding toward the exposed front |
| Rear-drain sink | Landing point that does not strike the rear wall or raised drain assembly |
| Sink with bottom grid | Stream position between grid wires where possible |
A faucet should not be selected only because it is tall, and a sink should not be selected only because it is deep.
Treat them as one functional system.
What brands and project buyers should verify
For B2B buyers, repeated splash complaints can create:
- Customer returns
- Negative product reviews
- Installer disputes
- Warranty requests
- Unnecessary faucet replacements
- Claims that the sink is too shallow
- Claims that the faucet has excessive pressure
These problems are easier to prevent during product development than after shipment.
Sink drawing requirements
Confirm:
- Overall sink dimensions
- Internal bowl dimensions
- Bowl depth
- Rear deck width
- Faucet-hole position
- Drain location
- Bottom slope
- Bottom-grid position
- Accessory height
- Installation method
Faucet drawing requirements
Confirm:
- Overall height
- Outlet height
- Spout reach
- Outlet angle
- Faucet-hole requirement
- Maximum mounting thickness
- Swivel range
- Flow rate
- Operating-pressure range
- Stream and spray patterns
- Pull-down hose reach
Wet-test the actual combination
Testing a faucet over a generic basin is not enough.
Use the intended sink model and test:
- Low, normal and full operating flow
- Stream and spray modes
- Empty bowl
- Drain assembly installed
- Bottom grid installed
- Workstation accessories installed
- Pull-down head docked and extended
- Faucet rotated through its usable range
Observe the front rim, rear deck, backsplash area and faucet base—not only the inside of the bowl.
Add splash control to sample approval
A practical sample-approval record can include:
- Faucet and sink model numbers
- Test pressure or representative operating condition
- Flow mode
- Landing-point photograph
- Short performance video
- Grid and drain configuration
- Corrective action, if needed
- Approved final combination
This creates a repeatable reference for future orders and reduces disagreements between sink, faucet and accessory suppliers.
Matrix supports coordinated sink, faucet and accessory programs for brands, importers, wholesalers and project buyers. Product teams can review the complete Matrix kitchen product range and installation support before approving a combination.
Final answer
A kitchen faucet splashes because the stream lands in the wrong place, falls too far, exits unevenly, hits a hard object or exceeds the bowl’s ability to contain the rebound.
Start with the least expensive checks:
- Empty the sink.
- Reduce the flow.
- Compare stream and spray modes.
- Inspect the aerator.
- Remove the bottom grid.
- Check faucet alignment.
- Measure the outlet height, reach and landing point.
Do not assume that a taller faucet, deeper sink or lower-flow aerator will automatically solve the problem.
The most reliable solution is a matched system in which the faucet delivers a stable stream into a clear part of a sink that is wide and deep enough to contain the resulting water movement.
Frequently Asked Questions
Why does my kitchen faucet splash only at full flow?
Full flow increases the amount and often the velocity of water striking the sink. If lower flow performs normally, check the aerator, stream concentration, landing point and household pressure before replacing the faucet.
Does a high-arc faucet splash more?
It can. A high outlet increases the water’s fall distance. It performs best with a sufficiently wide and deep bowl, a stable stream and a clear landing point.
Will a deeper kitchen sink stop splashing?
Not always. Deeper walls contain droplets better, but the longer fall distance can create a stronger impact. Sink depth must be matched with faucet height, reach, flow and bowl geometry.
What is the ideal kitchen faucet spout reach?
There is no universal ideal reach. It should place the stream clearly inside the bowl, away from the front and rear walls, while leaving enough working space for hands and cookware.
Should faucet water land directly on the drain?
Not necessarily. A raised strainer, disposal flange or drain cover can redirect water upward. A clear area near the lower drainage zone may perform better.
Can a faucet aerator reduce splashing?
Yes, if it produces a stable stream suitable for the sink. A dirty, damaged or poorly matched aerator can increase splash even when it reduces the total flow rate.
Does stainless steel cause more splash than granite composite?
Material alone is usually not the deciding factor. Landing point, bowl shape, fall distance, stream velocity and the first surface hit have a greater effect. Different materials may change sound and visual appearance, but geometry remains critical.
Can a bottom grid increase splashing?
Yes. Water hitting a grid wire can split and rebound. Test the faucet with and without the grid to determine whether its position contributes to the problem.
Why does my pull-down faucet splash only in spray mode?
Spray mode spreads water into multiple smaller streams. Hold the spray head closer to the item being rinsed, reduce the flow and check that the spray nozzles are clean and aligned.
Can Matrix help match sinks and faucets for an OEM product line?
Yes. Matrix Manufacture Co., Ltd. supports sink, faucet and accessory matching for private-label brands, distributors, wholesalers and project buyers. Buyers can send drawings, target specifications, product references and order requirements through the Matrix contact page.